
Like dropbox , box , Skydrive etc, you can set up your own cloud storage using an open source tool called OwnCloud. Using OwnCloud you can upload images, audio files, video files and you can sync it with various devices. It is pretty easy to install and manage. You can also create users defining a particular storage limit. Here am going to explain how to install and configure on the cloud on amazon EC2 servers.
Installing Owncloud On EC2 Ubuntu Instance:
Step1: Launch an Ubuntu instance on amazon ec2. If you are new to EC2 ,then you can check out the following link for creating an Ubuntu instance on amazon ec2. How to launch an ubuntu instance on amazon ec2
Step 2: Connect the instance using putty. How to connect ubuntu instance using putty
Step 3: Change the user mode to root using the following command.It allows you to install all the packages with root permission.
sudo su
Step 4: Update the server using the following command
apt-get update
Step 5: Install and configure LAMP server using the following command.
apt-get install lamp-server^
Step 6: Execute the following commands.
echo 'deb http://download.opensuse.org/repositories/isv:ownCloud:community/xUbuntu_12.04/ /' >> /etc/apt/sources.list.d/owncloud.list
Step 7:Update the packages using apt-get update command
Step 8:Install owncloud using the following command.
apt-get install owncloud
Step 9: Execute the following commands to change the permissions for owncloud.
chown -R www-data:www-data /var/www/owncloud/config
chown -R www-data:www-data /var/www/owncloud/apps
chown -R www-data:www-data /var/www/owncloud/data
Step 10: Go to sites-enabled folder and edit the 000-default file. Under directory options change “Allowoverride none” to “Allowoverride All”. Use nano or vi editor to edit the 000-default file and save the file.
cd /etc/apache2/sites-enabled/
nano 000-default

Step 11:Execute the following commands and restart the server.
a2enmod headers
a2enmod rewrite
service apache2 restart
Step 12: Now copy the public DNS of your instance and paste it in the browser followed by /owncloud and load the webpage.
eg:ec2-34-224-523-247.compute-1.amazonaws.com/owncloud
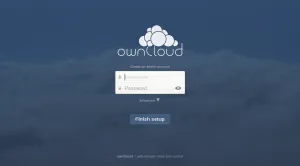
Step 13: You will see an admin page to enter the username and password. Enter a new username and password and click create an account. It will take you to the owncloud dashboard. There you can manage the groups, users, and the admin files.

Installing Owncloud On Windows Instance:
Step 1: Launch a windows instance
Step 2: connect the instance using remote desktop.
Step 3: Download and install Wamp server
Step 4: Download the owncloud zip package from the owncloud website. Download it here
Step 5: Extract the file to www folder of wamp and rename the folder to owncloud.
Step 6: Configure owncloud by running it on localhost using the following URL
http://localhost/owncloud
Step 7: You can access owncloud from anywhere using the public DNS of your windows instance. Make sure that you have added HTTP to the security group for your instance .
(share the post and leave a comment if you get an error while installing)
