
In this tutorial am going to explain how you can launch windows and Linux instances on windows azure to deploy a sample ruby on rails application. I assume you have an azure account and if you dont , you can create an account here Azure SignUp. You can subscribe for a one month free trial, in which you get to use most of the azure services for free.
Deploying Rails Application On Linux Instance:
1.Go to azure portal , click virtual machines and then click create a virtual machine option.
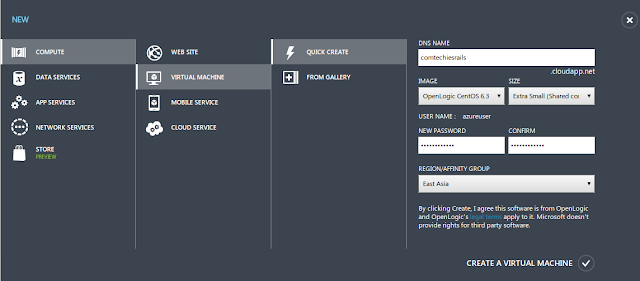
2. You can use quick create option or you can select image from gallery and customize the launch. If you want to use keys for your instance , you should go for launching instances from gallery. Here am going to use the Openlogic CentOS 6.3 image to deploy the rails application.
3.For quick create, give a DNS name which will be unique and using which you can access your deployed web application. Select the Openlogic Centos 6.3 from the images and select the extra small instance. Also provide a password, the username by default will be azureuser. Once you filled up all the details, click create virtual machine option.

4. Once the virtual machine is created, connect it using putty.
Setting Up Rails Environment:
1. Update the server
sudo yum update -y
2. Install the development tools for rails environment
sudo yum -y groupinstall "Development Tools"
3. You might get a kernal error while group install. If you did, then edit the /etc/yum.conf file and comment the last line #exclude = kernal* and try group install again.
4. Install few dependencies by executing the followinf command
sudo yum -y install ntp zlib zlib-devel sqlite-devel httpd mysql-server mysql-devel curl-devel httpd-devel apr-devel apr-util-devel mlocate manlibxml2-devel libxslt-devel libffi-devel readline-devel
5. Install Ruby version manager (rvm) by executing the following commands.
sudo curl https://raw.github.com/wayneeseguin/rvm/master/binscripts/rvm-installer | bash -s stable

sudo source /etc/profile.d/rvm.sh

sudo rvm install 1.9.3

sudo rvm use 1.9.3 default
6. Install Rails frame work using gem
gem install rails
7. Once rails got installed , you can create a new rails application in /var/www folder. You can create the application anywhere but i prefer it inside www. Execute the followinf command to create a new application.
rails new demo_app
demo_app is the name of the rails application.
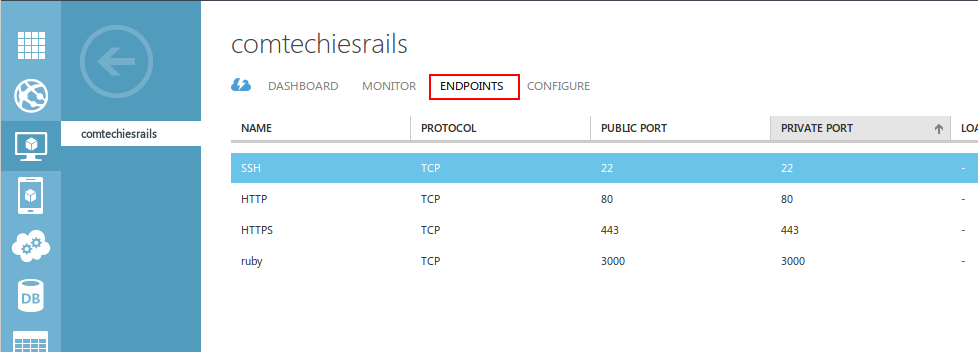
8. Now we have an application and in order to access it through the DNS provided by azure you have to specify the inbound firewall rules called endpoints in the azure portal. Click on the virtual machine and select the endpoints option. Click add and add http enpoint, so that you can publicly access the rails application using the DNS provided by Azure.
9. Rails comes with a default webrick web server, so you dont have to install and configure other web server for testing purposes. Execute the following command to start the webrick server with posr 80. By default webrick uses 3000, we will change it to 80 using the -b bind option.
rails server -b 80
In case if you get any javascript runtime error just install nodejs and start the rails server.
sudo yum install nodejs
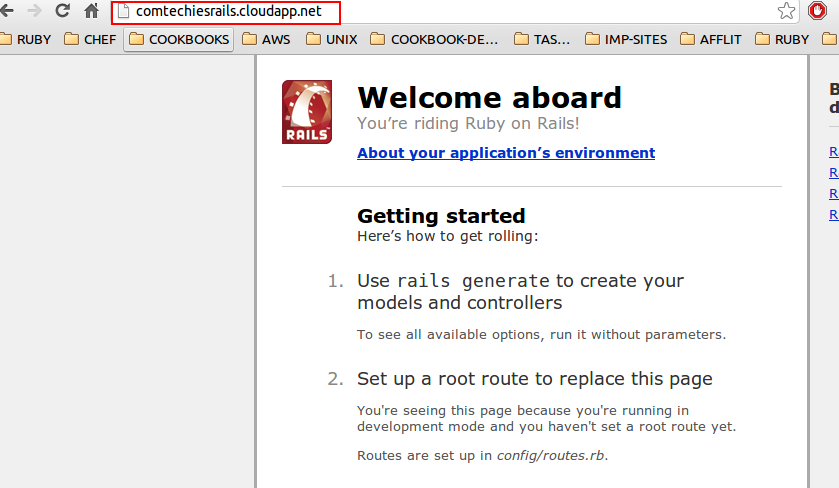
10. Once the server has started you can access your created application using the DNS provided by Azure. Eg: demoapp.cloudapp.net. The default rails application page will show up when you access the Public DNS.
Deploying Rails Application On Windows Instance:
Deploying rails application on a windows instance is much easier that Linux instances because railsinstaller will do all the trick.
1. Launch a windows server using the portal just like we did for Linux expect the image name differs, Under images you have to select the windows server image. Provide proper username and password and create the windows virtual machine.
2. After the VM is created , connect the windows server using RDP client with the username and password you provided at the time of VM creation.
3. Download the rails installer and install it. Rails installer will install ruby and all the necessary files required for rails environment , with the default webrick web server.
4. Provider necessary endpoints like we provided for the linux machine.
5. CD in to c:sites and create a new rails application using the command prompt.
rails new demo app
6. Once the application is created, start the webrick server with port binding to 80.
rails server -b 80
7. once the server in started , you can access the default application page using the Azure DNS for your windows machine.
Please share and leave a comment for any queries
