
You can configure windows azure public cloud service with chef workstation to bootstrap virtual machines and apply chef roles while bootstrapping based on your needs. For configuring the knife cli with windows azure , you need to install the knife-azure plugin and configure the creditials in knife.rb file. This tutorial will teach you how to configure knife-azure plugin with chef workstation. Through out this tutorial, ubuntu 12.04 is used.
2.Upgrade the ruby version to 1.9.1 and configure the system to use 1.9.1 using the following commands.
3.Install the knife plugin using gem.
You can also download the knife-azure plugin from github and install it using gem.
Download knife azure plugin here
4. Convert the decoded file to .pem file using the following commands.
Installing the knife-azure plugin:
1.Knife-azure has to be installed using ruby gems. Install ruby gems using the following commans.
apt-get install rubygems
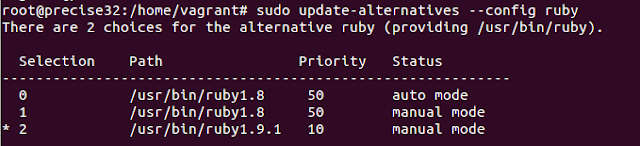
2.Upgrade the ruby version to 1.9.1 and configure the system to use 1.9.1 using the following commands.
sudo spt-get install ruby1.9.1-full
update -alternatives --config ruby
Note: Select 1.9.1 version after executing the above command

3.Install the knife plugin using gem.
gem install knife-azure
You can also download the knife-azure plugin from github and install it using gem.
Download knife azure plugin here
Configuring Windows Azure with Knife:
Inorder to bootstrap virtual machines with windows azure , you have to set the azure credentials with knife.rb file.
1. Login to your windows azure account and download the publishsettings file from the following link.
Publishsettings file download
2.Open the downloaded xml file and copy the contents of of managementcertificate tag. Copy the contents between the double quotes and paste it to a new file called cert.pfx
3. Use the following command to decode the pfx file.
base64 -d cert.pfx > decoded_cert.pfx
4. Convert the decoded file to .pem file using the following commands.
openssl pkcs12 -in decoded_cert.pfx -out management-certificate.pem -nodes

#after executing the above command it will ask for password.Just hit enter without typing anything.
5.Copy the created pem file to .chef folder and add the following credentials to the knife.rb file.
knife[:azure_subscription_id] = "your azure subscription id"
knife[:azure_mgmt_cert] = "/path/to/managementcert.pem"

Note: You can get the subscriber id from the publishsettings xml file.
6. cd in to .chef folder and execute the following command to see if the knife-azure plugin is configured correctly.
knife azure server list

#the above command will list the running VM's in your azure account
7. For more azure commands type <knife azure > in the terminal, it will list the available options.
Creating a windows VM using knife-azure plugin:
1. <knife azure server create> command is used to provision a server with azure. The following commands provision a windows 2012 datacenter extra small vm in east asia region.
knife azure server create
--azure-dns-name 'knifeazuredemo'
--azure-source-image "a699494373c04fc0bc8f2bb1389d6106__Windows-Server-2012-Datacenter-201306.01-en.us-127GB.vhd"
--winrm-password 'p@ssw0rd!'
--azure-service-location "East Asia"
