


In this guide, I have explained the steps required to setup Letsencrypt SSL certificates for websites running on an Nginx web server using Certbot utility.
Prerequisites:
- A working website running on Nginx which is accessible over a valid domain name.
- The server should be able to server traffic on 443 port. Make sure you have allowed port 443 on your firewall rules.
Note: This setup is done on a Ubuntu 18.04 server. You can use this guide on Amazon ec2, GCP , Digital Ocean or any other cloud VM's.
Nginx Letsencrypt Setup Guide
Key Steps Involved in Nginx Letsencrypt Configuration are as follows
- Install and Configure Certbot
- Generate Nginx SSL configuration files Using Certbot
- Verify certbot certificates
- Letsencrypt Autorenewal Setup Using Certbot
Lets get started with the setup.
Step 1: Update the server
sudo apt updateInstall and Configure Certbot
Step 2: Install Certbot utilities
sudo apt install certbot -y
sudo apt-get install -y python-certbot-nginx
Generate Nginx SSL configuration files using Certbot.
The beauty of certbot is that you dont have to manually create or generate the private keys and other Nginx configurations required for SSL certificates. It automagically creates it for you.
Step 1: Execute the following certbot command to generate the SSL certificates and Nginx configurations.
sudo certbot --nginxYou will be promted for the following information.
- You site admin email address
- Terms of Service agreement.
- List of domains you need HTTPS for. Certbot will automatically detect this information from the Nginx conf files.
- HTTP to HTTPS redirection confirmation (it is better to redirect)
You Might Like: Setup Free SSL (https) for WordPress Website using Cloudflare
Step 2: Open your nginx.conf and verify the SSL configurations. You should see a configuration like below autogenerated by certbot. Now you will be able to access your site over https.
listen [::]:443 ssl ipv6only=on; # managed by Certbot
listen 443 ssl; # managed by Certbot
ssl_certificate /etc/letsencrypt/live/kartsavings.com/fullchain.pem; # managed by Certbot
ssl_certificate_key /etc/letsencrypt/live/kartsavings.com/privkey.pem; # managed by Certbot
include /etc/letsencrypt/options-ssl-nginx.conf; # managed by Certbot
ssl_dhparam /etc/letsencrypt/ssl-dhparams.pem; # managed by Certbot
}
server {
if ($host = kartsavings.com) {
return 301 https://$host$request_uri;
} # managed by Certbot
listen 80 default_server;
listen [::]:80 default_server ipv6only=on;
server_name kartsavings.com www.kartsavings.com;
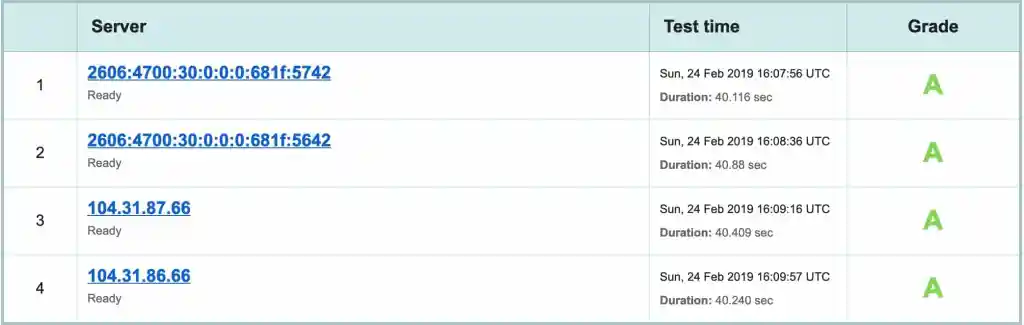
return 404; # managed by CertbotStep 3: Now, head over to https://www.ssllabs.com/ssltest/analyze.html and enter the domain name that you configured for Letsencrypt. It will show your SSL grade as shown below.
Verify Certbot Certificates
You can verify the generated SSl certificates using certbot command.
Execute the following command to view the existing certificates on you server.
sudo certbot certificatesLetsencrypt Autorenewal Setup Using Certbot
Letsencrypt certificates expires every three months. So it is very important that you have a mechanism to auto renew the certificates every three months.
Certbot will do this job for you. It adds a Linux cron task automatically.
You can check the certbot cron using the following command.
cat /etc/cron.d/certbotIf you want to know how the certificate renewal works, you can run the renew command using a dry run. It will just simulate the process.
sudo certbot renew --dry-run