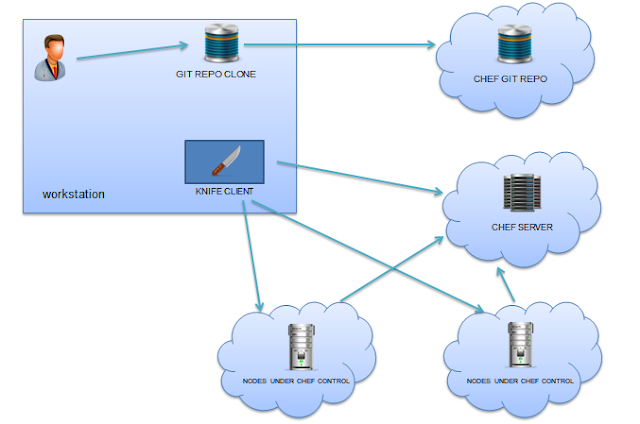
You can run a chef cookbook on a node in two ways.
1.Using chef server
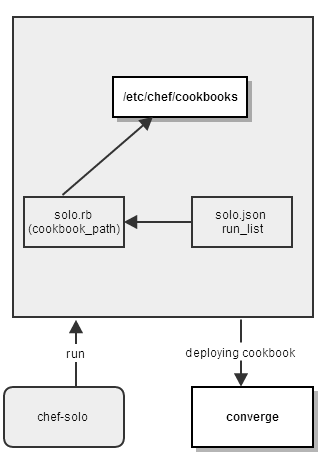
2.Using chef-solo
If you want to manage cookbook deployments in an efficient way ,then it is better to set up a chef server and manage your nodes using the chef server. If you want to run your cookbooks without setting up a chef server, then chef-solo would do the work.
In this tutorial I am going to explain how to write a chef cookbook for apache web server to run a static website and deploy the cookbook on a ubuntu 13.04 node using chef-server and chef solo.
Ubuntu 13.04 server is used throughout this tutorial.
Creating a cookbook:
You can create a cookbook using knife command. Knife is the cli tool which is used to manage cookbooks, roles, environments etc,, and to interact with the chef server api.
CD in to the .chef folder and issue the following command in the terminal to create a cookbook .
CD in to the .chef folder and issue the following command in the terminal to create a cookbook .
Knife cookbook create apache2There are various options associated with the knife cookbook command. You can view those options by typing knife cookbook create –help in the terminal.
The cookbook will be created in the path specified in the knife. If you want to create a cookbook in a specified folder, then you have to use the –o option with the knife command.
Knife cookbook create apache2 –o c:chefcookbooksThe cookbook created by the knife command will have the following directory structure.
├─attributesThe uses of every folder can be found in the opscode docs.
├─definition
├─files
└─default
├─libraries
├─providers
├─recipes
├─resources
└─templates
└─default
http://docs.opscode.com/essentials_cookbooks.html
Creating Recipe For Apache2 Installation:
default.rb file under recipes folder contains the instructions to install and configure a site on apache web server.
package 'apache2' do
action :install
“Package” in the above snippet is called a resource. When the chef-client identifies this resource , it will look for the package provider. Provider is a bunch of ruby code comes bundled with the chef client. Provider identifies the operating system type using the ohai plugin, which also comes bundled with the chef client. Action attribute is by default set to install. If you provide upgrade in the place of install, the package resource will install the latest apache package available in the repository(yum, apt. etc..) with respect to the operating system.
Note: Chef resources are idempotent. Once a package is installed , it wont get installed during the successive client runs. Once the changes made in the cookbook gets reflected in successive client runs.
package 'unzip' doThe above snippet will install unzip functionality in the server, which we will need later to unzip the website files.
action :install
end
cookbook_file '/var/www/site.zip' docookbook_file resource creates a site.zip file and copies the contents from the apache2 cookbooks files/default/site.zip directory to /var/www/site.zip in the server. Make the css, images ,html and js in to a zip file and copy it the apache2/files/default directory. Source is the site.zip file in our cookbook. Chef looks for files under the /files/default folder , so you don’t have to mention the source path explicitly.
source 'site.zip'
mode '0755'
owner 'root'
group node['apache']['root_group']
end
node['apache']['root_group'] is the attribute which we mention in apache2/attribute/default.rb file. You have to create a default.rb file in the /attribute folder in your cookbook.
Default.rb looks like this.
default['apache']['root_group'] = ‘root’So node['apache']['root_group'] sets the value ‘root’ in the recipe.bash "extracting files" do
cwd "/var/www"
code <<-EOH
unzip site.zip
EOH
not_if {File.exists?("/var/www/images")}
end
bash resource in the above snippet is used to run the system commands on the server. cwd makes the current directory as /var/www. The commands you want to run in the server terminal comes under the code <<-EOH block. Here we are unzipping the site.zip file to /var/www folder in the server.
Note: bash resource in chef is not idempotent. So during successive chef client runs this resource will get executed again and again. To achieve idempotency we have use the not_if or only_if condition. This checks if a folder called images exists in the /var/www/ folder using the file.exists? method. If exists, the bash resource will not run.
template "/var/www/index.html" doThe template resource is used to make changes to the existing files in the server. In ouu use case, we have to replace the index.html file which is already present in the server with our sites index.html. For this we have to create a index.html.erb file under apache2/templates/default/index.html.erb and copy the index contents of your sites index file. /var/www/index.html is the path of the file in the server. Source is the template file in our cookbook. By default chef looks for template files under the default folder, so you don’t have to mention the path explicitly in the source attribute.
source "index.html.erb"
mode '0644'
owner 'root'
group node['apache']['root_group']
end
Final recipe:
package 'apache2' do
end
package 'unzip' do
end
cookbook_file '/var/www/site.zip' do
source 'site.zip'
mode '0755'
owner 'root'
group node['apache']['root_group']
end
bash "extracting files" do
cwd "/var/www"
code <<-EOH
unzip site.zip
EOH
not_if {File.exists?("/var/www/images")}
end
template "/var/www/index.html" do
source "index.html.erb"
mode '0644'
owner 'root'
group node['apache']['root_group']
end
Testing The cookbook For Ruby Syntax Error:
Once you finish writing your cookbook, you can test your cookbook for ruby syntax errors using the following command.
Knife cookbook test apache2Deploying the cookbook using chef server:
1.Upload the cookbook to the chef server using the following commands
Knife cookbook upload apache22.Add the cookbook to the runlist of a node using the following command. Knife node run_list add node_name recipe[‘apache2’]3.Once the cookbook is added to the node’s runlist , run the chef client in the node to deploy the apache2 cookbook from the chef server. Chef-clientDeploying the cookbook using chef solo:
1.You don’t need a chef server to deploy cookbooks using chef solo. But you should have the cookbooks in the node which you are running chef solo.cookbook_path "etc/chef/cookbooks"cookbook_path is the path to the cookbook in the node. It can be anywhere in the server , you have to mention it accordingly in the solo.rb file. Log_level is set to debug so that you can see the debug information while running chef-solo. You can also set the log level to info mode.
log_level :debug
log_location "etc/chef/solo.log"
We supply the run list to the node using a json file.You can also pass attributes using the json file. Create a file solo.json and copy the following configurations .
{Put the solo.rb and solo.json files inside /etc/chef folder. CD in to /etc/chef and run chef solo using the following command.
"run_list": [ "recipe[recipe]"],
}
Chef-solo -c solo.rb –j solo.json      (or)
Chef-solo –c /path/to/solo.rb -j /path/to/solo.json


