
Cloudbees basically supports java based applications and MySql database. Web developers can use Cloudbees to host java based web apps in the cloud. You can host your static as well as dynamic websites on Cloudbees. If you want to point your custom domain (eg: www.comtechies.com), you have to be a premium member of Cloudbees.If you are using the free account ,then your app dns will have .cloudbees.net extension. In this tutorial am going to explain how to host JSP and MySql website on Cloudbees.
There are few advantages with hosting JSP and MySql websites on Cloudbees. First, it is reliable , since it is hosted on Amazon EC2 servers. Also you get dedicated databases servers from Amazon. Second, you can host your website for free if it is a low traffic website. So, lets get started with the website deployment.
Here i have used eclipse IDE for the JSP website development. The application basically has a login page, registration page and a database connection test page to test the database connection.

Step 1: Login to your cloudbees account and create an application and MySql database. If you are new to cloudbees ,you can refer the following article to create an application and database.
Step 2: Download and unzip this file Cloudbees.zip. This contains the basic jsp login ,regirstaion files, which you can run it on eclipse.Now replace the database host name , username and password in reg.jsp, connectiontest.jsp and login.jsp by you database host name, username and password.

Step 3: Compile the website locally on your desktop using eclipse, and MySql server.If everything is ok, convert your website folder to war format, since cloudbees apllication can only be deployed in war format. If you are using eclipse for your jsp web appliation, go to file-->export-->web-->war to create the awar file for your application.
Step4 :Go to cloudbees account and navigate to the apps menu at the top letf corner.There you can see your created application. Click on the appliation, there you can see the dns for your application and other details.If you scroll down little you ll see an option called "Alternatively upload your war file".
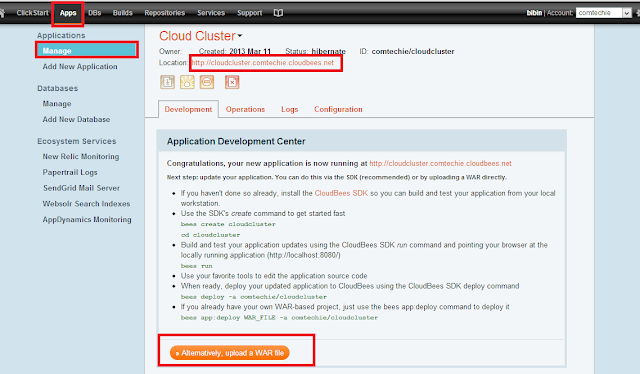
Step4 :Go to cloudbees account and navigate to the apps menu at the top letf corner.There you can see your created application. Click on the appliation, there you can see the dns for your application and other details.If you scroll down little you ll see an option called "Alternatively upload your war file".

Step 5: Click on "upload war file" button , browse to location of war file you created and click finish. It will take a while for your application to upload. Once uploaded you can view your application using the dns of your application. I have created a sample application on cloudbees. You can check it out here DEMO
