


In this guide, we will look into self-hosting Magento on an Ubuntu server.
Self-hosting Magento gives you control over compute, networking, database, etc.
But Magento is not an application that comes in a single package, it needs additional configurations for web server, PHP, search engine, and other components.
Lets get started.
What is Magento?
Magento is an open-source e-commerce platform used to build and manage online stores.
It provides features like catalogs, shopping cart, customer accounts, payments, and other features required to run an e-commerce website.
Magento's codebase is managed by Adobe, and it is also the foundation of their Adobe Commerce site.
If you are self-hosting Magento, you need to manage the whole infrastructure and install and configure each component, like the web server, PHP, search engine, etc.
Magento depends on scheduled background jobs to do its operations.
For example, it uses cron jobs to perform operations like indexing and sending emails, and it is one of the key parts of the setup.
Also, even in its official documentation, it is mentioned that without proper cron configuration, Magento will not work properly.
Magento Architecture
The following image shows a complete architecture of Magento.
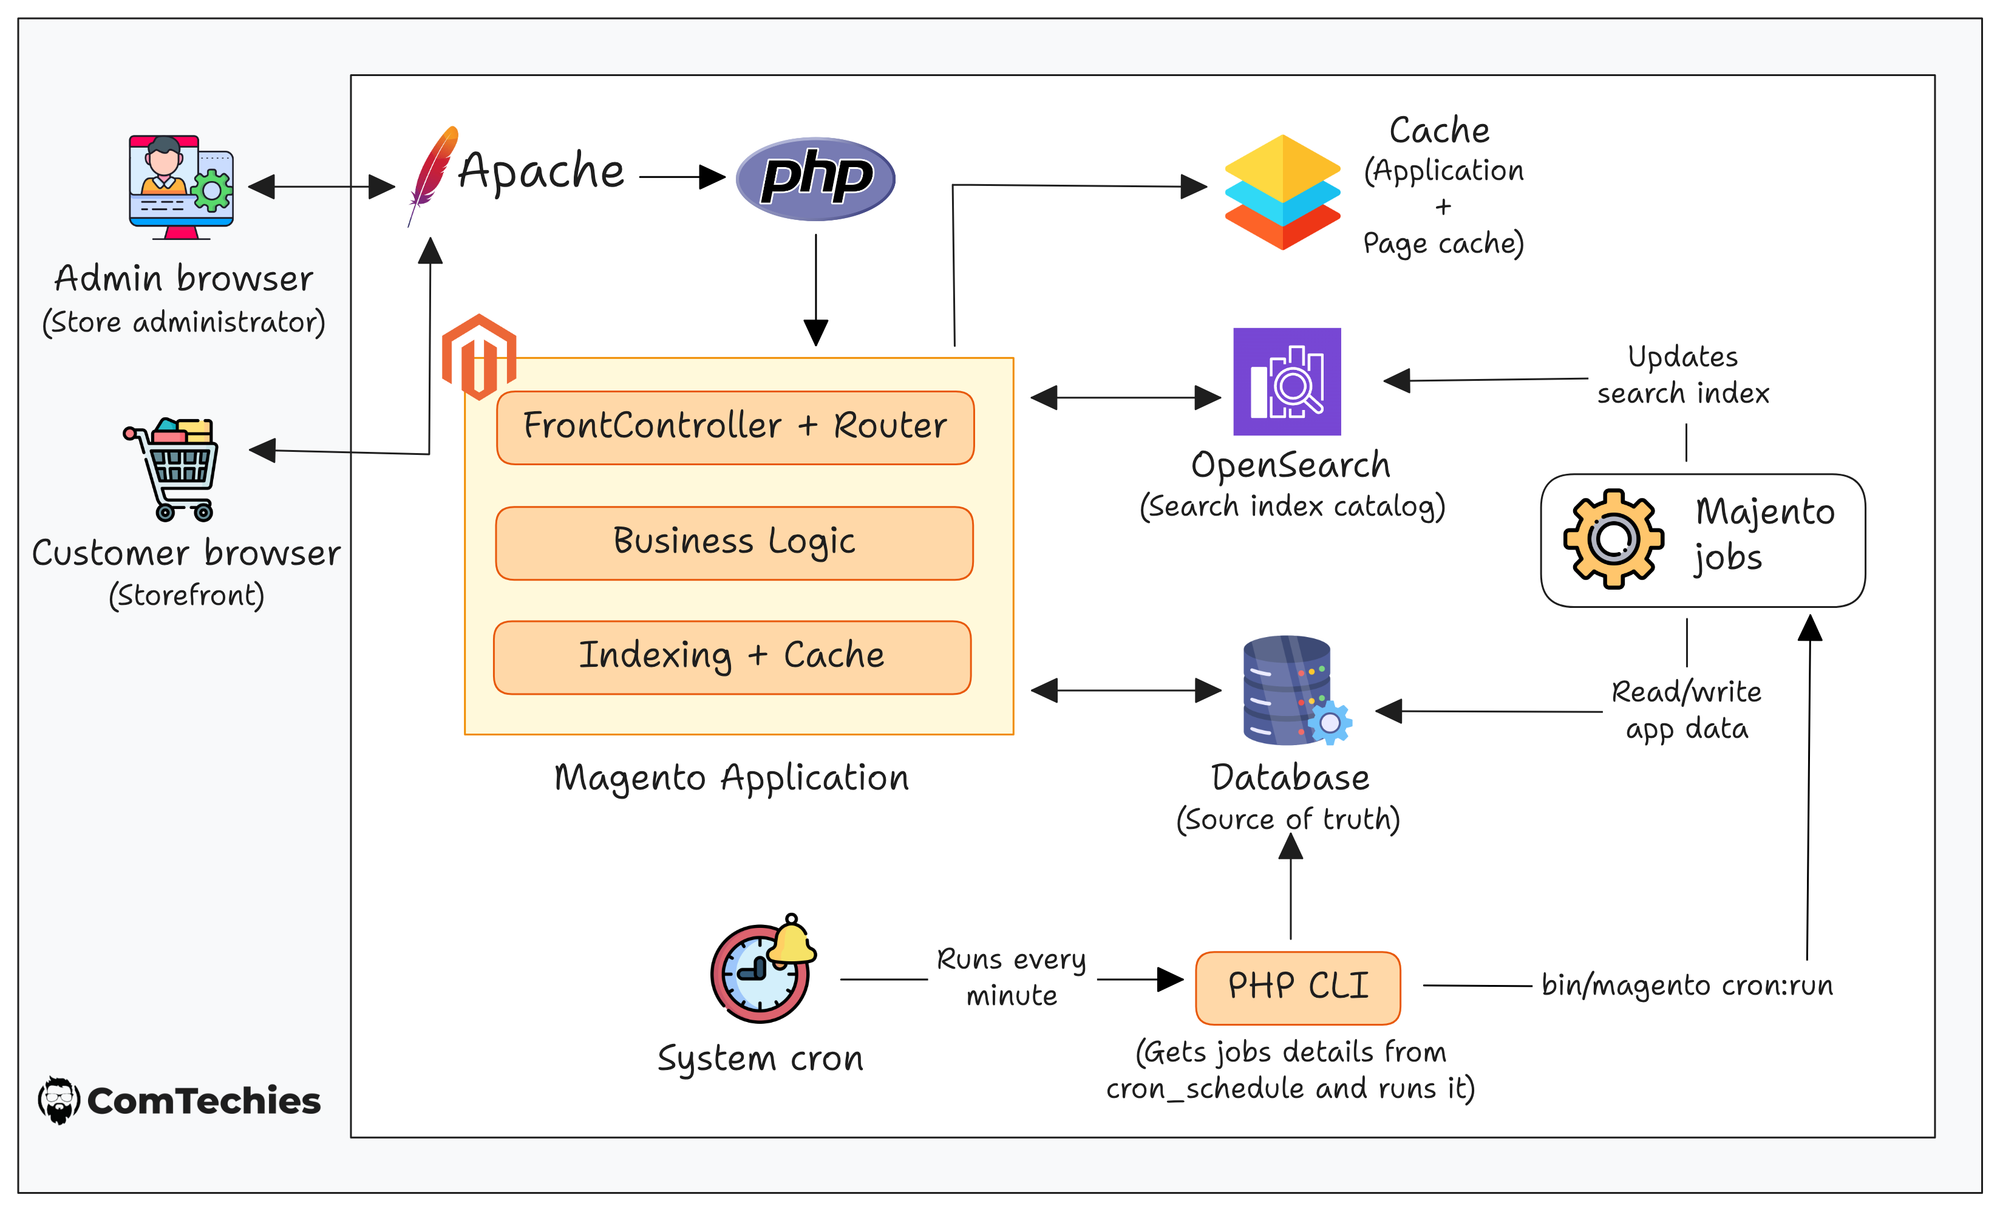
Below are the core components of Magento:
- Storefront - This is the customer-facing component of Magento that receives customer requests from the browser. This is the frontend for the Magento application. The path to the Storefront is the domain you configured, eg.,
https://shop.example.com. - Admin - This is the portal for admins who manage the site. Using this, you can manage products, fix categories, customer info, order details, and other configurations. The path will be something like
https://shop.example.com/admin_x7k92 - Search Engine - Magento uses a dedicated search engine for catalog search. This searches for products indexed in the catalog so customers can get the product they are searching for. In this guide, we will use OpenSearch.
- Web Server - To get HTTP/HTTPS requests from the browser to send them to the application, Magento needs a web server. We will use the Apache web server for our setup.
- Router - Magento uses an in-built router to route the requests from customers or admins to the storefront or admin portal. First,
FrontControllerreceives the request, finds the correct route and forwards the traffic to it. - PHP - Magento is a PHP-based application, the request from the web server is processed by PHP and sent to Magento.
- Database - Magento stores its data in a relational database, which includes details such as products, customers, orders, and other data. In this guide, we will use RDS MySQL as the database.
- Cache - Magento saves its application and web page caches to avoid processing the same data and to increase response speed.
- Cron Jobs - As we mentioned above, Magento uses Cron Jobs to perform its backend operations. Magento makes use of the system's cron to schedule the jobs. The system cron runs regularly and uses PHP to run the Magento cron command to trigger the jobs, which get data from databases
cron_scheduletable and run them one by one.
Lets get into the hands-on part.
Prerequisites
Below are the prerequisites for this setup.
- AWS CLI
- AWS dashboard access to RDS, ACM, CloudFront, and Route53
- Active DNS on Route53
- EC2 Instance with minimum requirements:
- Instance Type - t3.large
- CPU - 2 vCPU
- RAM - 8 GiB
- OS - Ubuntu 26.04 LTS
- Storage - 30+ GB gp3
Before setting up Magento, we have to create some additional AWS services.
Here, we will create an RDS database, configure DNS for the EC2 instance, and create access keys for Magentos private package registry.
Lets get started.
Create AWS RDS Database for Magento
Instead of installing MySQL on the same server, we will make use if AWS RDS MySQL.
Since RDS is a managed service, AWS will take care of the database management and backup.
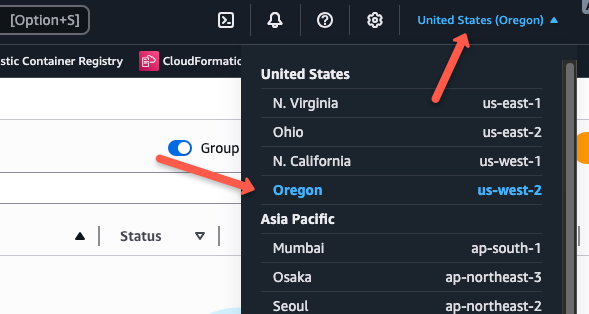
Now, in the AWS dashboard, go to Aurora and RDS and select the region where you want to create the database, which is the region where you have created the instance.
Before creating the database, we need to create a custom parameter group for AWS RDS. Because, while using the default parameter group, the log_bin_trust_function_creators setting is turned off by default.
We are turning this on because Magento needs to create trigger actions in the database. This action will be blocked by RDS because RDS blocks the MySQL SUPER privilege.
And the trigger action needs the MySQL SUPER privilege to do it.
Here, the trigger action refers to the action done by Magento to track data changes to update the index automatically.
By enabling the log_bin_trust_function_creators parameter, we can create the trigger without MySQL SUPER privilege and prevent Magento from failing when creating database triggers.
Run the following command to create the custom parameter group.
aws rds create-db-parameter-group --db-parameter-group-name magento-mysql84 \
  --db-parameter-group-family mysql8.4 --description "Magento"
aws rds modify-db-parameter-group --db-parameter-group-name magento-mysql84 \
  --parameters "ParameterName=log_bin_trust_function_creators,ParameterValue=1,ApplyMethod=immediate"
Then start creating the database by clicking the Create database button.
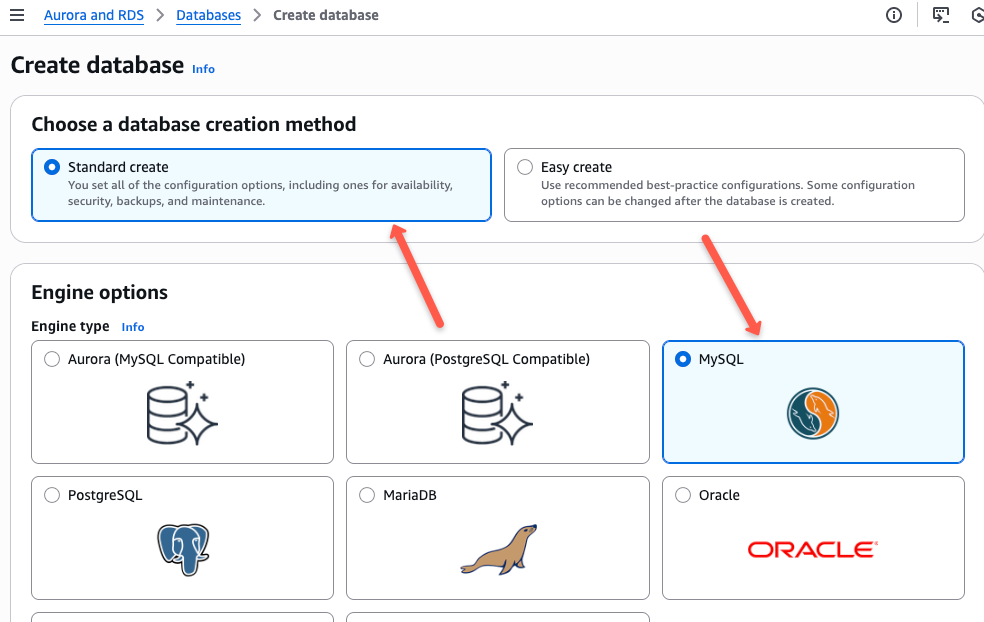
Then choose the Standard database creation method and select MySQL.
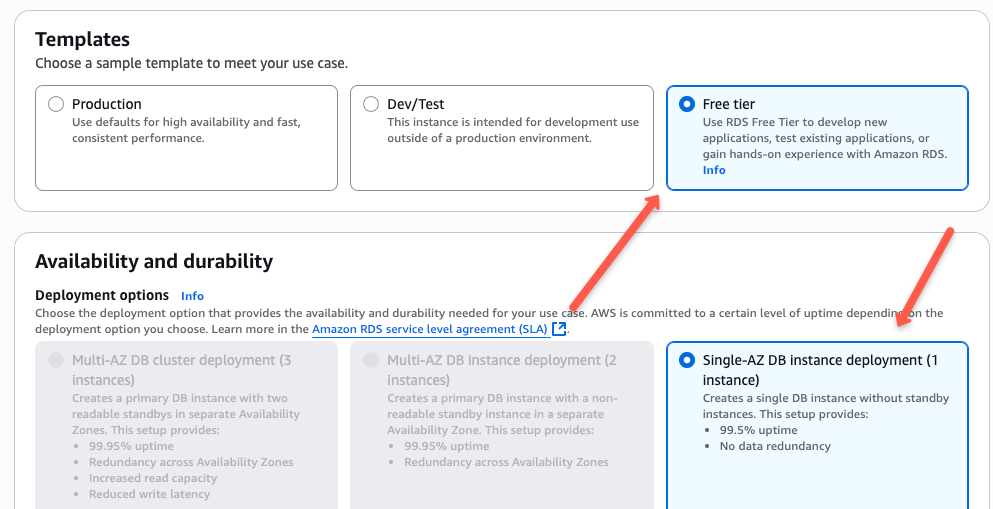
Select the template according to your requirements and give a name to your database.
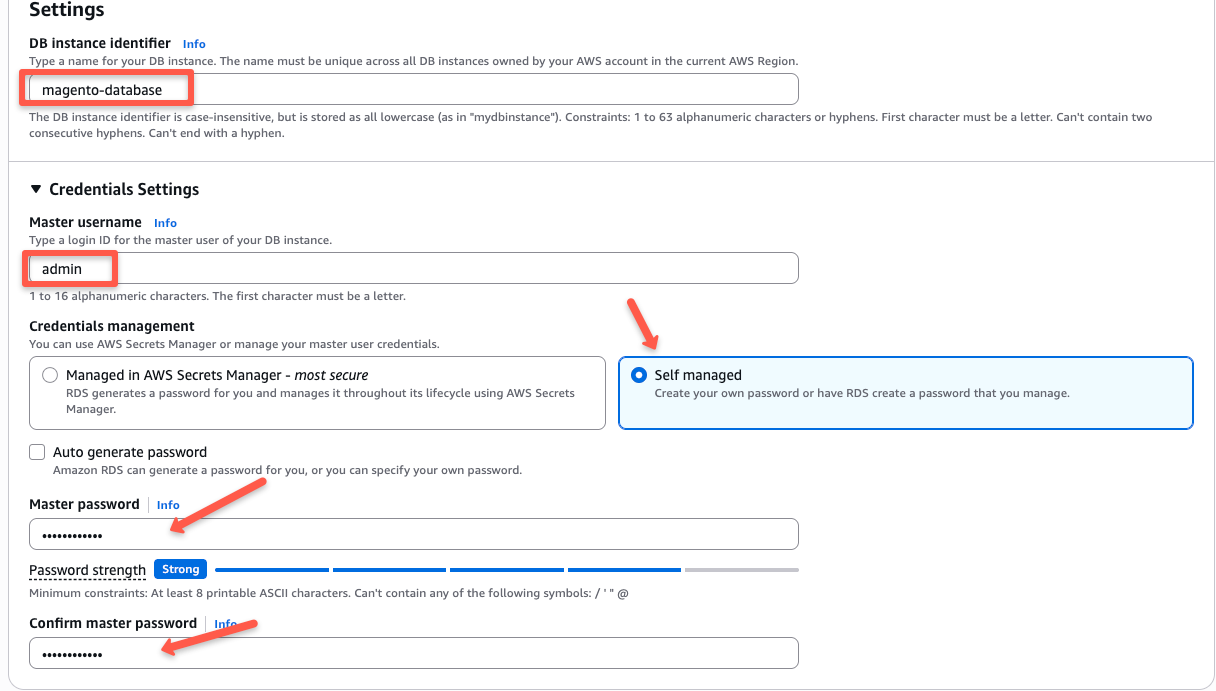
Then, give a name for the database instance in the DB instance identifier.
And, in the credential settings, give the master username, and for the password, you can either select managed in AWS Secrets Manager or self-managed.
If you select managed in AWS Secrets Manager, RDS will create the password in Secrets Manager, and you can get it from there.
If you select self-managed, you have to set the master password as shown below.
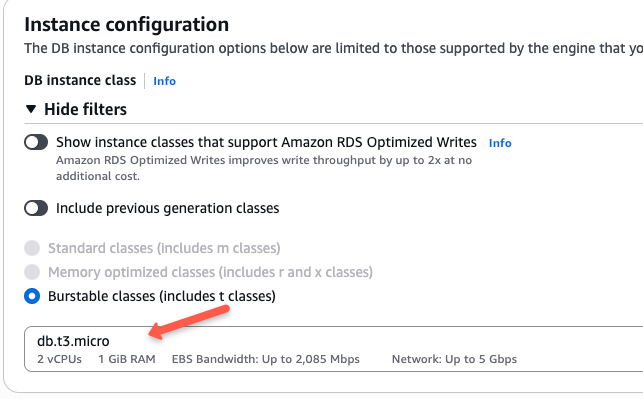
Now, choose the instance storage configuration as per your requirement.
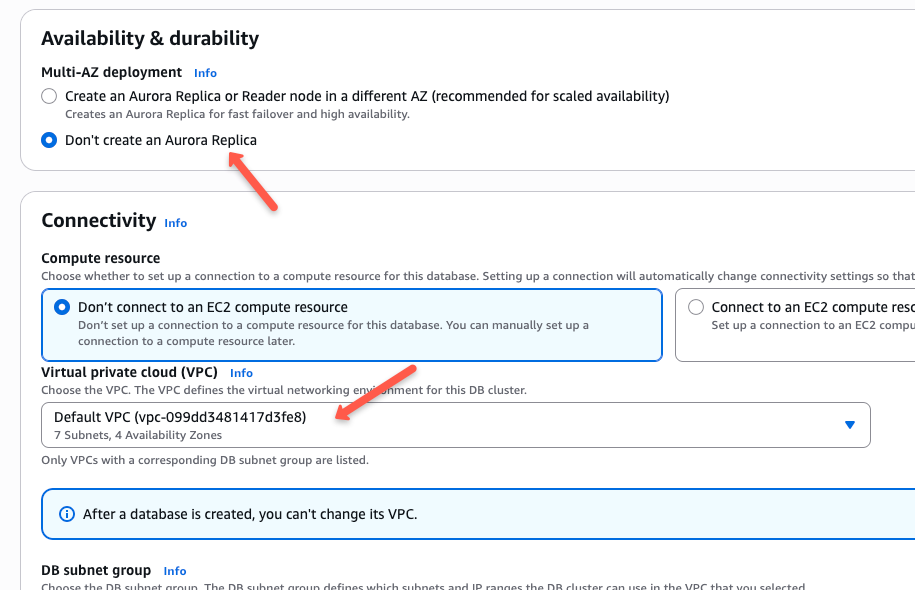
Select the availability based on your choice and select the VPC where your instance is created.
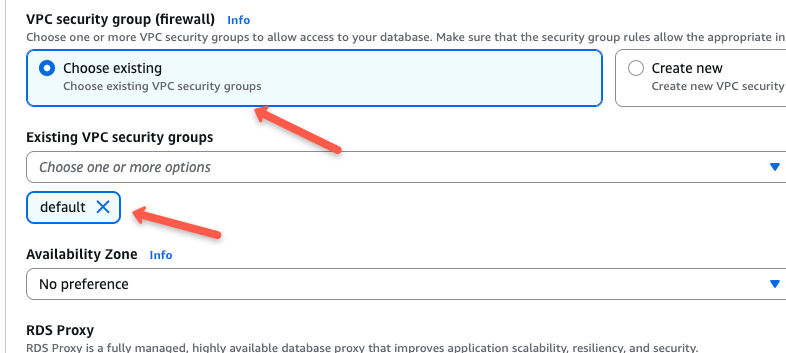
Then choose an existing security group in your VPC or create a new one that allows inbound traffic for port 3306.
Now, click the Additional configuration toggle button and select the custom parameter group you created before.
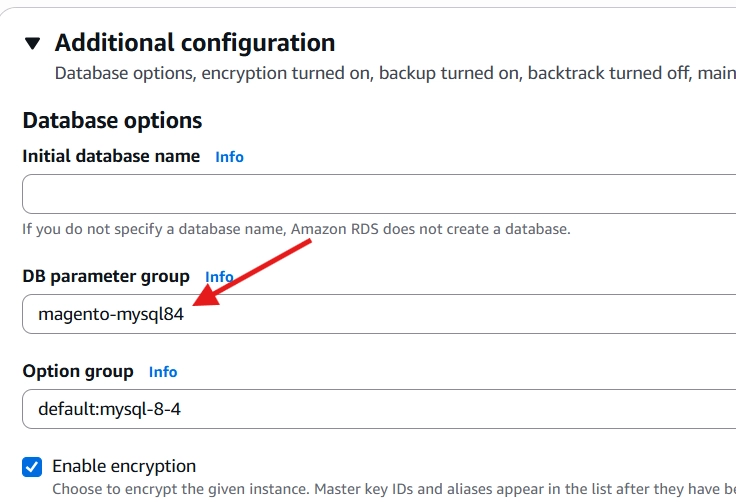
Scroll down, you will see further configuration, change it according to your requirement or keep it in default options.
Once every configuration is set, scroll down and click the Create database button at the bottom to create the database.
You will see the database start creating as shown below.
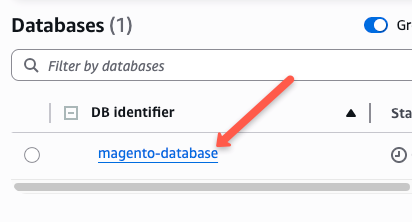
It may take a few minutes to create.
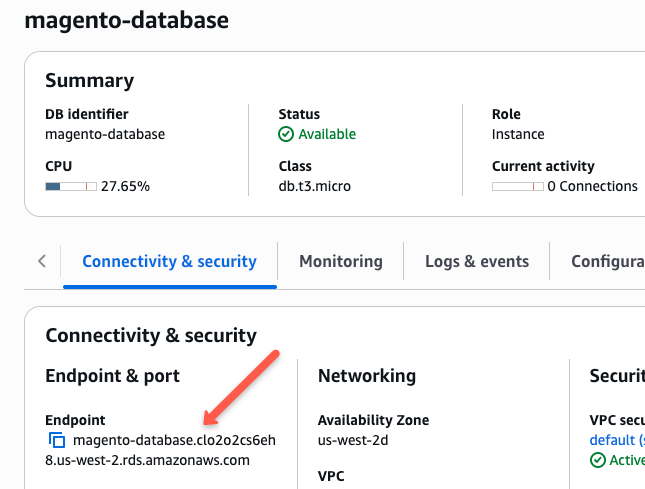
Once its available, copy the endpoint of the database as shown below, which will be used while configuring the database for Magento.
Configure DNS for the EC2 Instance
First, start by configuring your EC2 instance with your Domain.
Now, go to Route 53 -> Hosted Zones -> Your Domain, then click the Create record button, which will take you to the following tab.
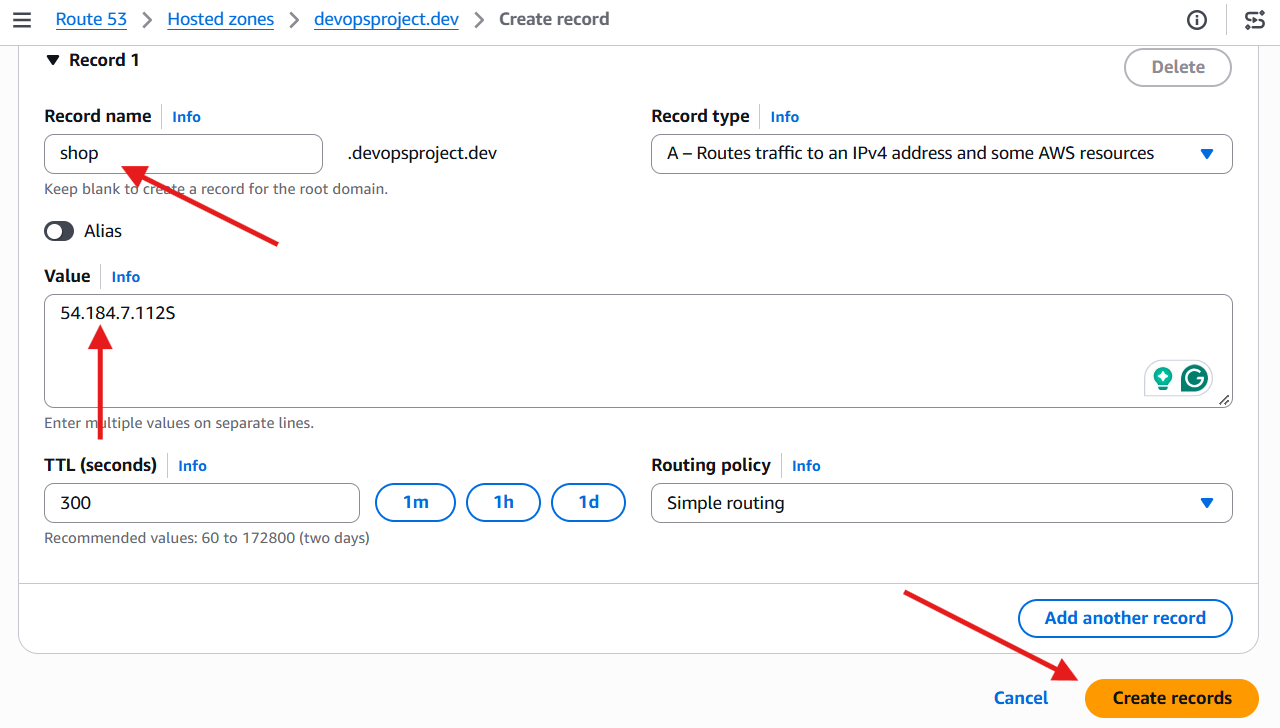
Select the A record, give it a name and enter your EC2 instance's public IP as shown above.
After setting everything, click Create records to create the DNS record.
The record will take some time to become available, in the meantime, we will set up Magento on the EC2 instance.
Create Magento Private and Public Key
We need to create public and private keys on Adobe Marketplace for Composer to download packages from repo.magento.com.
To create a private and public key for Composer, go to Adobe Commerce Marketplace and create an account or sign in to your account.
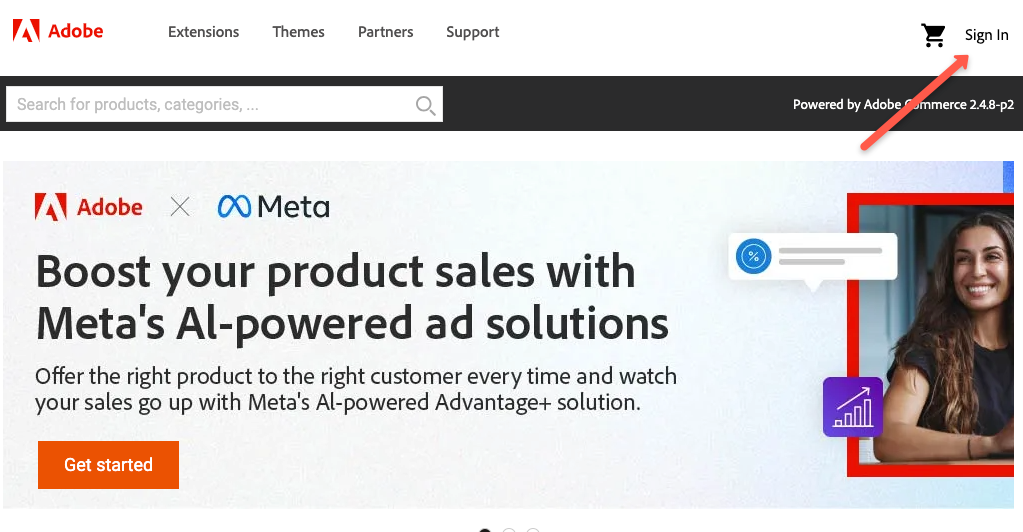
Once logged in, go to My Profile at the top right corner and click Access Keys, as shown below.
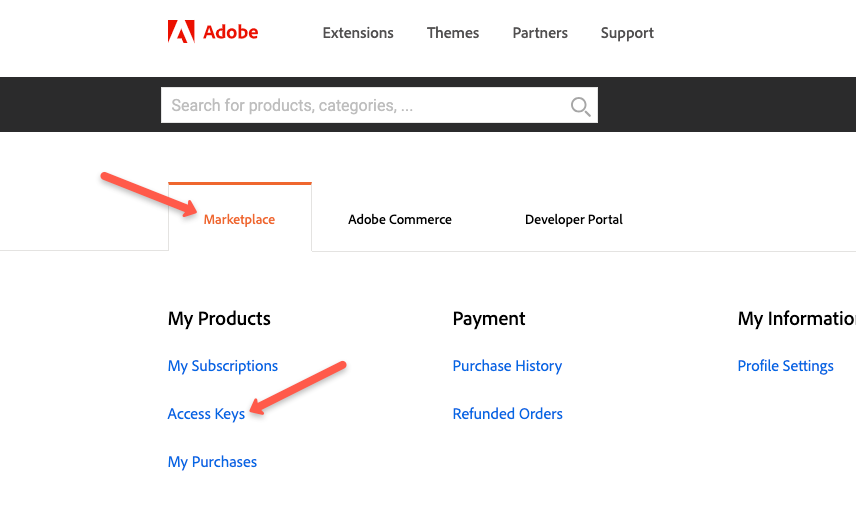
Then click on the Create A New Access Key button to create a public and private key.
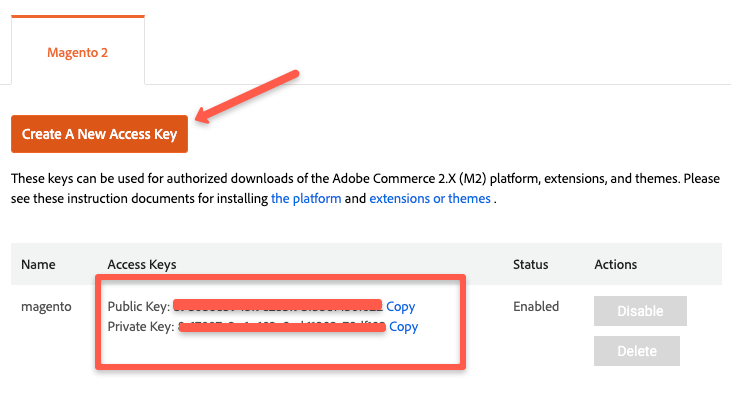
These public and private keys will be used as a username and password by Composer for authenticating to download Magento packages from the private registry repo.magento.com.
Lets get started with the Magento setup.
Steps to install Magento on AWS EC2 Instance?
In this section, we will install and configure the following tools:
- Apache
- PHP
- Composer
- OpenSearch
- Magento
The following diagram gives you a high-level architecture diagram of the complete Magento setup we are going to do.
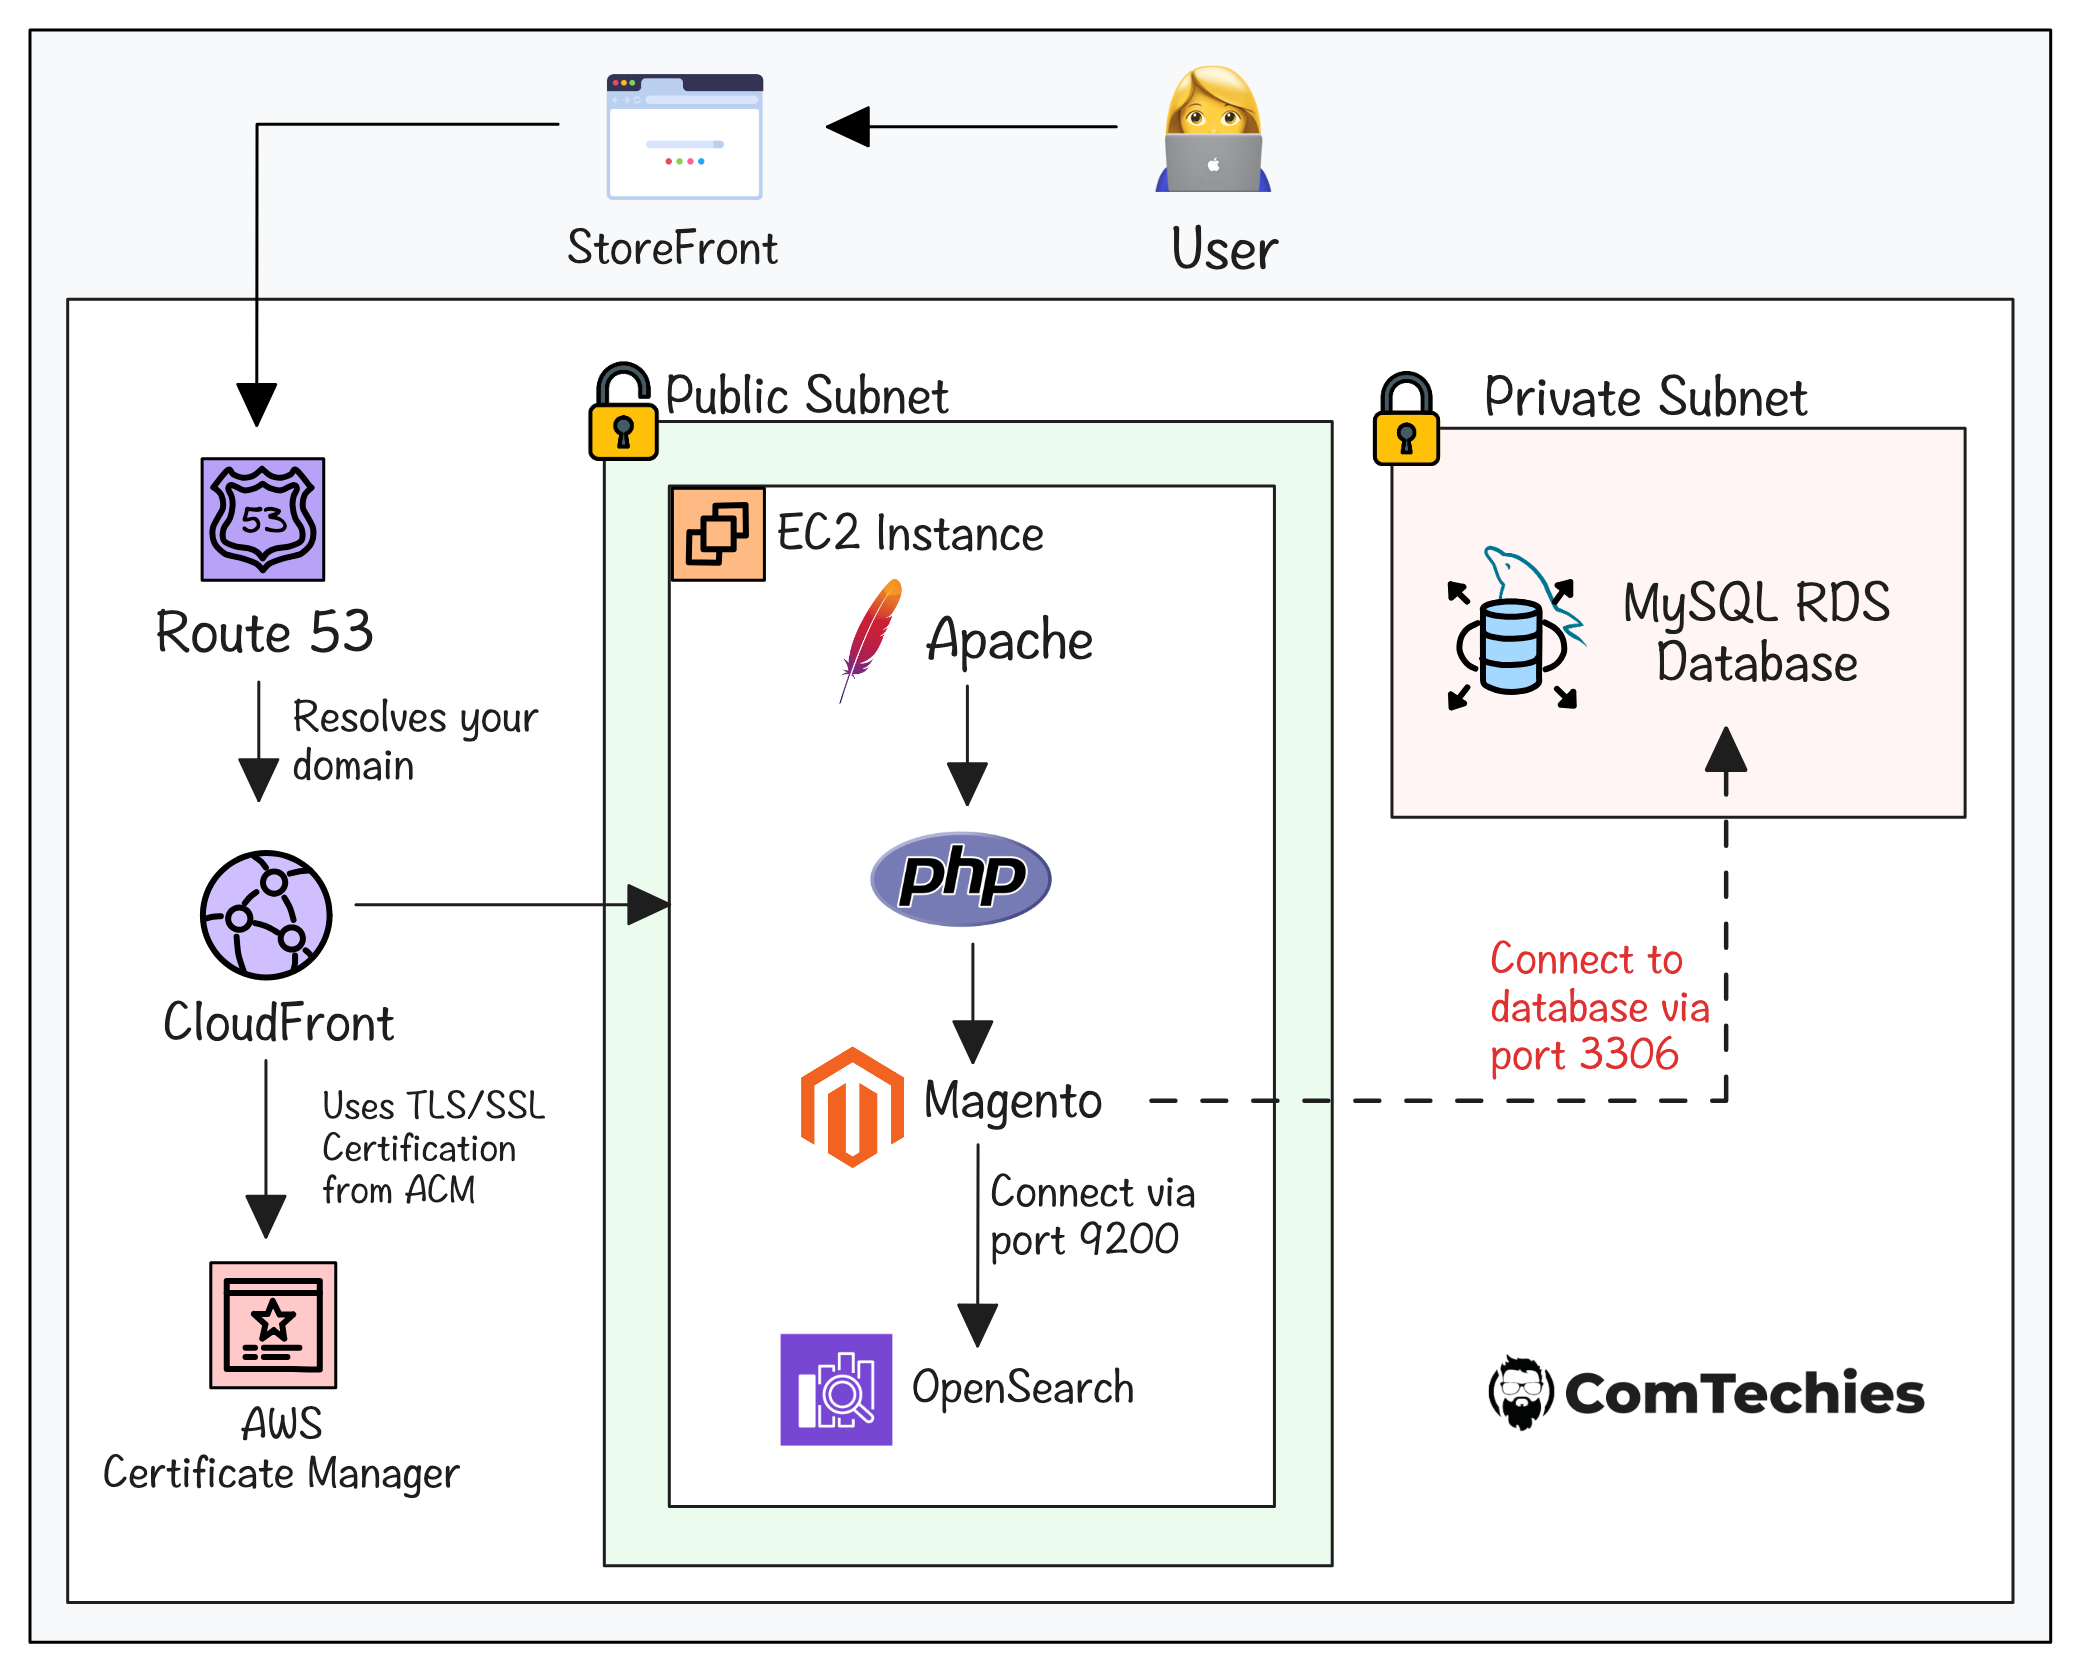
Follow the steps below to set up Magento on an AWS EC2 instance.
Step 1: SSH into your EC2 Instance and update it
First, SSH into your EC2 instance, you can either use EC2 Instance Connect or PEM file from your local.
If you are using a PEM key, SSH into the instance using the following command.
ssh -i <pem-key-path> ubuntu@<instance-ip>Once you login, run the following command to update apt.
sudo apt update && sudo apt upgrade -yThen install the base tools required while setting up Magento.
sudo apt install -y \
  software-properties-common \
  ca-certificates \
  curl \
  wget \
  git \
  unzip \
  gzip \
  tar \
  lsof \
  gnupg \
  mysql-client
Step 2: Install Apache for Magento
We will use Apache as the web server for the Magento setup.
Now, run the following commands to install and start Apache.
sudo apt install apache2 -y
sudo systemctl start apache2
sudo systemctl enable apache2
Once the installation is complete, run the following command to check the status of Apache.
sudo systemctl status apache2If the installation is successful, you will get the following output at the end.
● apache2.service - The Apache HTTP Server
     Loaded: loaded (/usr/lib/systemd/system/apache2.service; enabled; preset: enabled)
     Active: active (running) since Mon 2026-10-05 14:01:56 UTC; 4s ago
       Docs: https://httpd.apache.org/docs/2.4/
   Main PID: 13925 (apache2)
      Tasks: 55 (limit: 4667)
     Memory: 5.2M (peak: 5.5M)
        CPU: 39ms
     CGroup: /system.slice/apache2.service
             ├─13925 /usr/sbin/apache2 -k start
             ├─13928 /usr/sbin/apache2 -k start
             └─13929 /usr/sbin/apache2 -k start

Oct 05 14:01:56 ip-172-31-11-179 systemd[1]: Starting apache2.service - The Apache HTTP Server...
Oct 05 14:01:56 ip-172-31-11-179 systemd[1]: Started apache2.service - The Apache HTTP Server.
Server version: Apache/2.4.58 (Ubuntu)
Server built:   2026-10-3T11:10:09
Step 2: Install PHP
Magento needs PHP for accessing the database, XML processing, and other application functions
To install PHP, we need to add the PHP repository and run the following command to add it.
Since we are using Ubuntu 26.04, which also comes with the PHP repository, we do not need to install the repository.
If you are using an Ubuntu version less than 26, run the following command.
sudo add-apt-repository ppa:ondrej/php -y
sudo apt update
Now, run the following command to install PHP and its extensions.
sudo apt install -y \
  php8.5 \
  php8.5-cli \
  php8.5-common \
  libapache2-mod-php8.5 \
  php8.5-mysql \
  php8.5-xml \
  php8.5-curl \
  php8.5-gd \
  php8.5-mbstring \
  php8.5-soap \
  php8.5-intl \
  php8.5-bcmath \
  php8.5-zip
After the installation is completed, run the following command to check if PHP is installed.
php -vYou will get the following output.
PHP 8.5.7 (cli) (built: Jul  4 2026 13:08:18) (NTS)
Copyright (c) The PHP Group
Built by Ubuntu
Zend Engine v4.4.26, Copyright (c) Zend Technologies
    with Zend OPcache v8.4.26, Copyright (c), by Zend Technologies
Step 3: Configure PHP for Magento
Magento's dependency installation and static resource generation can consume more memory and take time to execute.
Now, update the PHP configuration for Apache to increase the resource limit.
To do that, open the /etc/php/8.5/apache2/php.ini file and modify the following values.
max_execution_time = 3600
max_input_time = 1800
memory_limit = 2G
post_max_size = 20M
upload_max_filesize = 20M
Finding and manually changing each line can be a bit difficult, so use the following SED commands to change the values.
PHP_INI="/etc/php/8.5/apache2/php.ini"

sudo sed -i 's/^memory_limit = .*/memory_limit = 2G/' "$PHP_INI"

sudo sed -i 's/^max_execution_time = .*/max_execution_time = 3600/' "$PHP_INI"

sudo sed -i 's/^max_input_time = .*/max_input_time = 1800/' "$PHP_INI"

sudo sed -i 's/^upload_max_filesize = .*/upload_max_filesize = 20M/' "$PHP_INI"

sudo sed -i 's/^post_max_size = .*/post_max_size = 20M/' "$PHP_INI"
Then, restart Apache using the following command.
sudo systemctl restart apache2
Step 4: Install Composer
Composer is the component that Magento uses to download and manage PHPs packages.
Now, run the following commands to install the dependency manager for PHP.
php -r "copy('https://getcomposer.org/installer', 'composer-setup.php');"
php composer-setup.php
sudo mv composer.phar /usr/local/bin/composer
php -r "unlink('composer-setup.php');"
Once the installation is finished, use the following command to verify if it is installed.
composer --versionYou will get the following output.
Composer version 2.10.3 2026-08-27 13:34:23
PHP version 8.5.7 (/usr/bin/php8.5)
Run the "diagnose" command to get more detailed diagnostics output.
Step 5: Install OpenSearch for Magento
OpenSearch is the component that Magento uses for its catalog search.
We will be installing OpenSearch on the same machine, which will only be accessible through localhost (127.0.0.1:9200).
First, add the OpenSearch signing key.
sudo mkdir -p /etc/apt/keyrings

curl -fsSL https://artifacts.opensearch.org/publickeys/opensearch-release.pgp \
  | sudo gpg --dearmor --yes \
  -o /etc/apt/keyrings/opensearch.gpg
Then, add the OpenSearch repository and update the apt repository.
echo "deb [signed-by=/etc/apt/keyrings/opensearch.gpg] https://artifacts.opensearch.org/releases/bundle/opensearch/3.x/apt stable main" \
  | sudo tee /etc/apt/sources.list.d/opensearch-3.x.list

sudo apt update -y
Since we are running both OpenSearch and Magento on the same server, disable the demo security configuration.
sudo env \
  DISABLE_INSTALL_DEMO_CONFIG=true \
  DISABLE_SECURITY_PLUGIN=true \
  apt-get install -y opensearch
Lets configure OpenSearch for Magento.
Step 6: Configure OpenSearch for Magento
Before starting, back up the default configuration file.
sudo cp /etc/opensearch/opensearch.yml \
  /etc/opensearch/opensearch.yml.backup
Then run the following command to create a new file /etc/opensearch/opensearch.yml with the required configurations.
sudo tee /etc/opensearch/opensearch.yml >/dev/null <<'EOF'
cluster.name: magento
node.name: magento-search-01

path.data: /var/lib/opensearch
path.logs: /var/log/opensearch

network.host: 127.0.0.1
http.port: 9200

discovery.type: single-node

plugins.security.disabled: true
EOF
We will also configure systemd to restart OpenSearch if it fails.
First, create the systemd configuration file.
sudo mkdir -p /etc/systemd/system/opensearch.service.dThen run the following command to add the configuration in it.
printf '[Service]\nRestart=on-failure\nRestartSec=10\n' \
  | sudo tee \
  /etc/systemd/system/opensearch.service.d/restart.conf \
  >/dev/null
Next, reload the daemon, enable, and restart OpenSearch.
sudo systemctl daemon-reload
sudo systemctl enable opensearch
sudo systemctl restart opensearch
Once every command is executed, run the following command to check the status of OpenSearch.
sudo systemctl status opensearchIf everything is ok, you will see the service in a running state.
Step 7: Create Magento Database and User in RDS
Since we have already created the RDS MySQL database, try to connect to the RDS MySQL database from the EC2 instance using the MySQL client.
Run the following login command to check if the database is accessible from the instance.
mysql -h <your_Endpoint> -u admin -p
If it's accessible, it will ask for the password. Enter the password of the RDS database, and it will be connected.
Then, create a database inside RDS using the following command.
CREATE DATABASE IF NOT EXISTS magento;Next, create a separate user for Magento.
CREATE USER 'magento'@'%' IDENTIFIED BY '<password>';Then, give permissions for the created database to the user magento.
GRANT ALL ON magento.* TO 'magento'@'%';

FLUSH PRIVILEGES;
Verify the permissions of the user using the following command.
SHOW GRANTS FOR 'magento'@'%';
You will get the following output.
+---------------------------------------------------------------------------------------------------------------------------------------------------------------------------------------------------------------+
| Grants for magento@%                                                                                                                                                                                            |
+---------------------------------------------------------------------------------------------------------------------------------------------------------------------------------------------------------------+
| GRANT USAGE ON *.* TO `magento`@`%`                                                                                                                                                                             |
| GRANT ALL PRIVILEGES ON `magento`.* TO `magento`@`%`                                                                                                                                                         |
+---------------------------------------------------------------------------------------------------------------------------------------------------------------------------------------------------------------+
3 rows in set (0.00 sec)
To exit the database, use the following command and press Enter.
EXIT;Step 8: Download Magento Packages
Start by configuring Composer with Magento marketplace access keys we created before to authenticate and download Magento packages from the Adobe registry.
composer config --global --auth http-basic.repo.magento.com <public_key> <private_key>Now, Composer has the credentials to get packages from repo.magento.com.
Next, create a folder magento in /var/www/html directory, give ubuntu user access to it and move into it using the following command.
sudo mkdir -p /var/www/html/magento
sudo chown -R ubuntu:www-data /var/www/html/magento
cd /var/www/html/magento
Then run the following command to download and install Magento packages using Composer.
composer create-project --repository-url=https://repo.magento.com/ magento/project-community-edition=2.4.9 .Run the following commands to set the Ubuntu user as the owner of the folders var/, generated/, vendor/, pub/static/, pub/media/, app/etc/ and files inside them.
find var generated vendor pub/static pub/media app/etc -type f -exec chmod g+w {} +
find var generated vendor pub/static pub/media app/etc -type d -exec chmod g+ws {} +
sudo chown -R ubuntu:www-data .
Then make the Magento CLI executable.
chmod u+x bin/magentoStep 9: Configure Apache for Magento
Now, its time to configure the installed Apache to route requests to Magento.
For that, open Apache virtual host config file and add the configuration, including the config file location and its rules.
shop.devopsproject.dev to your DNS which we will create later in this blog.sudo vi /etc/apache2/sites-available/shop.devopsproject.dev.confNow, add the following configurations in the config file.
<VirtualHost *:80>

    ServerName shop.devopsproject.dev

    AllowEncodedSlashes NoDecode

    DocumentRoot /var/www/html/magento/pub

    <Directory /var/www/html/magento/pub>
        Options FollowSymLinks
        AllowOverride All
        Require all granted
    </Directory>

    ErrorLog ${APACHE_LOG_DIR}/magento_error.log
    CustomLog ${APACHE_LOG_DIR}/magento_access.log combined

</VirtualHost>
Then run the following commands to enable URL rewriting, disable the default site, and enable your site.
sudo a2enmod rewrite

sudo a2ensite shop.devopsproject.dev.conf

sudo a2dissite 000-default.conf

sudo systemctl restart apache2
Step 10: Install Magento
Now that the server, database, web server, and search engine are ready, its time to install Magento.
Run the following command to install Magento.
/var/www/html/magento and the base-url and values mentioned inside <...> are updated with your infos.bin/magento setup:install \
--base-url="http://shop.devopsproject.dev/" \
--db-host="<rds-endpoint>" \
--db-name="magento" \
--db-user="magento" \
--db-password="<database-password>" \
--admin-firstname="Admin" \
--admin-lastname="User" \
--admin-email="<admin-email>" \
--admin-user="<admin-user>" \
--admin-password="<strong-admin-password>" \
--language="en_US" \
--currency="USD" \
--timezone="Asia/Kolkata" \
--use-rewrites=1 \
--search-engine="opensearch" \
--opensearch-host="127.0.0.1" \
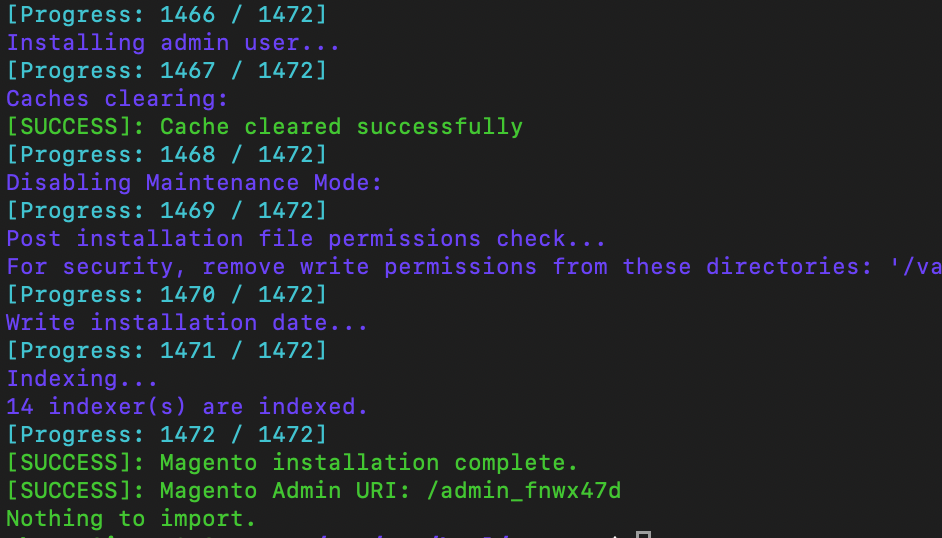
--opensearch-port="9200"The installation takes some time and once the installation is successful, you will get the following output at the end.
Step 11: Configure Magento Cron and Enable Production Mode
First, enable production mode in Magento.
/var/www/html/magento.bin/magento deploy:mode:set productionThen, reindex Magento, clear cache, and reinstall Magento cron.
bin/magento indexer:reindex
bin/magento cache:flush
Since Magento relies on cron for scheduled operations, lets configure it.
bin/magento cron:installStep 12: Setup CloudFront for Magento
In this section, we are going to configure CloudFront for Magento caching. Since CloudFront can automatically create ACM certificates for the DNS, we will be creating an SSL/TLS certificate for the domain.
Now, go to CloudFront on your AWS console and click on Create Distribution.
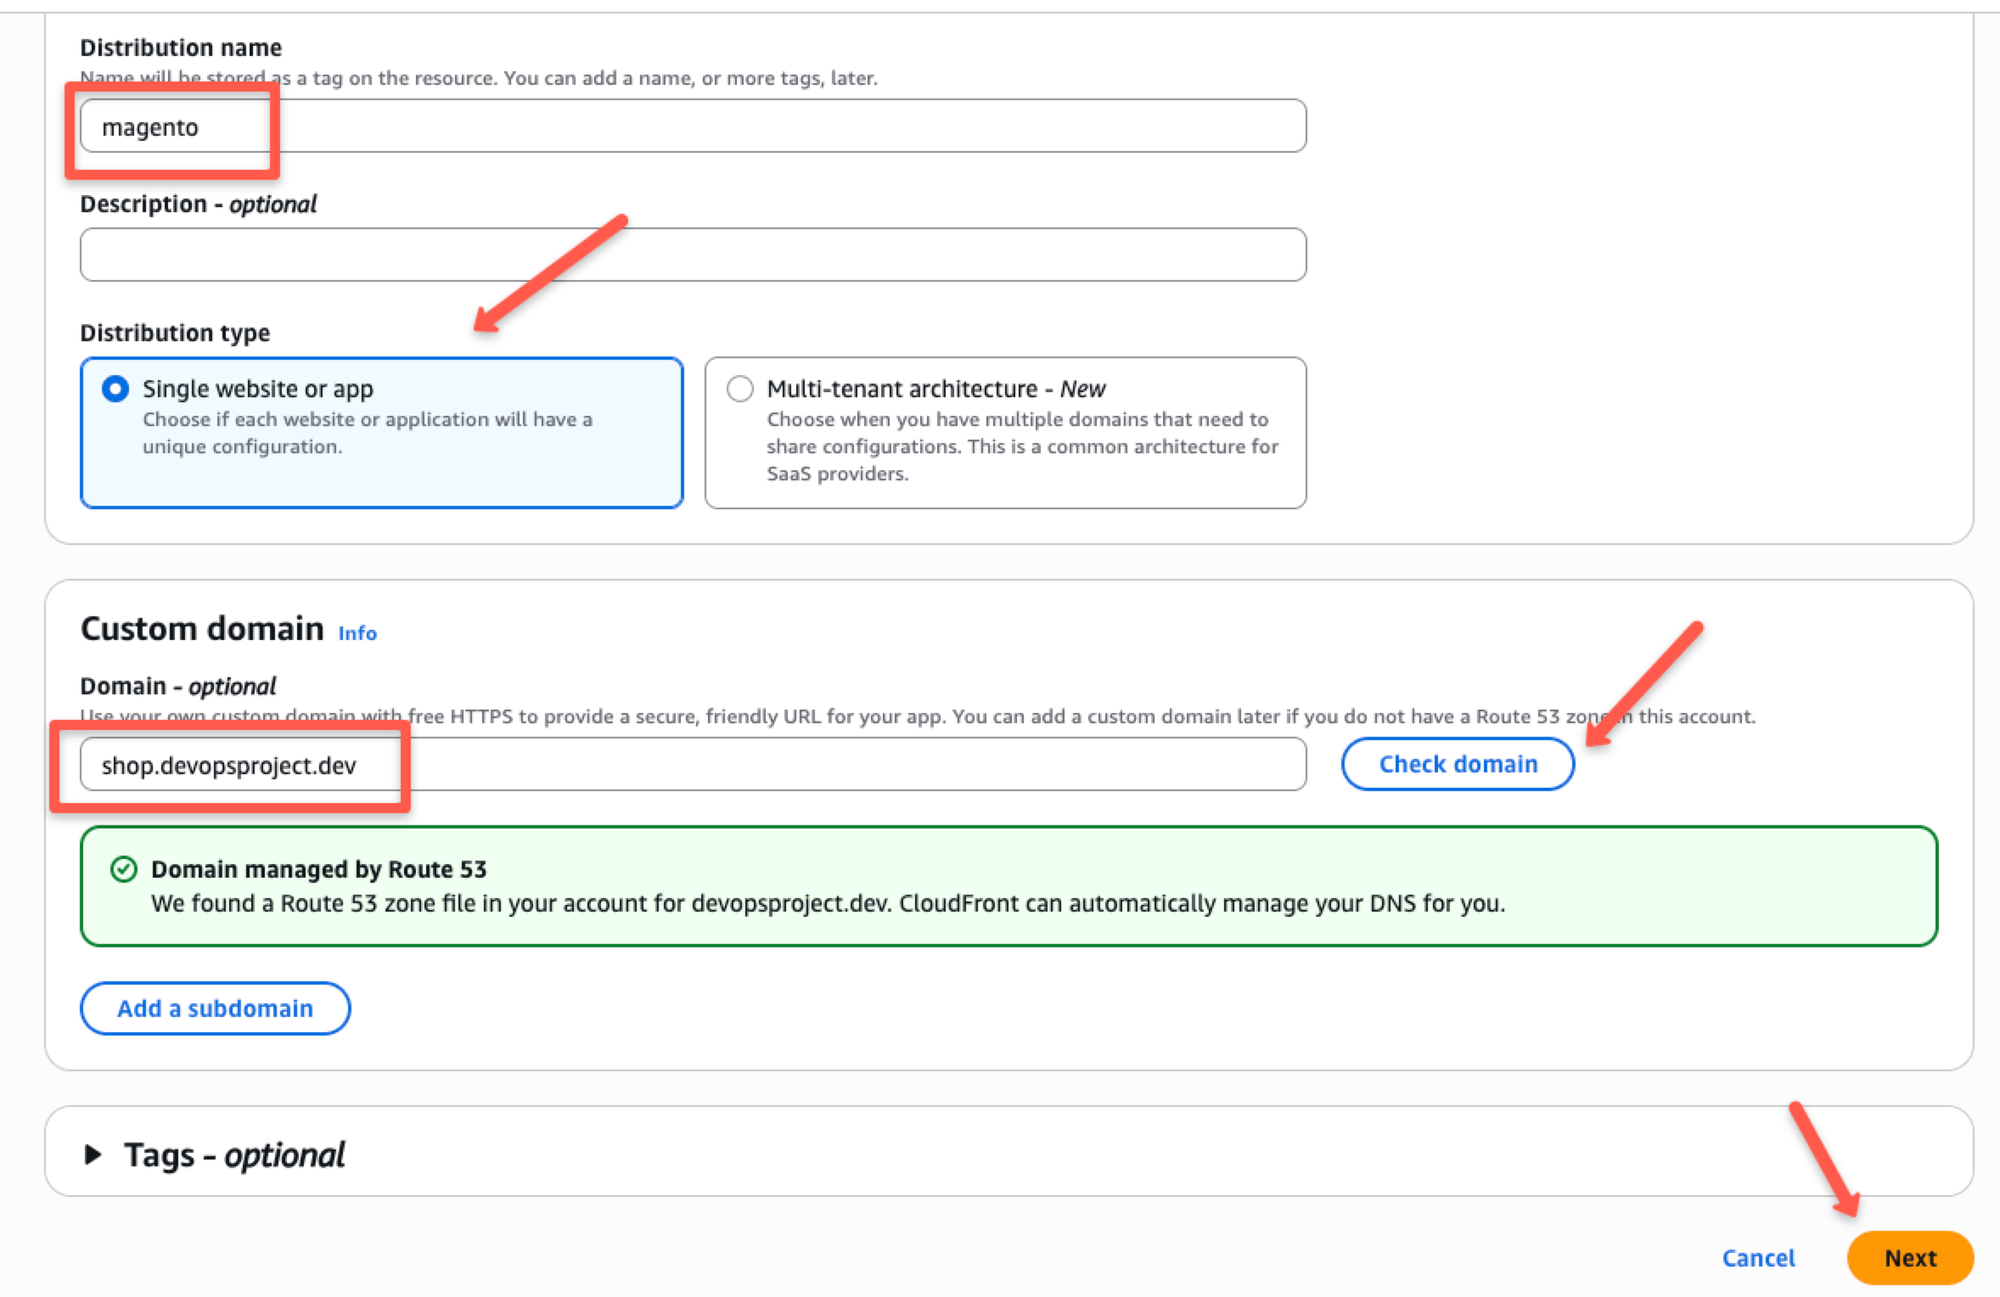
Then, give a name for the distribution and select the type as Single website or app.
Next, enter your domain and click the Check domain button to check if the DNS is managed by Route 53 as shown below.
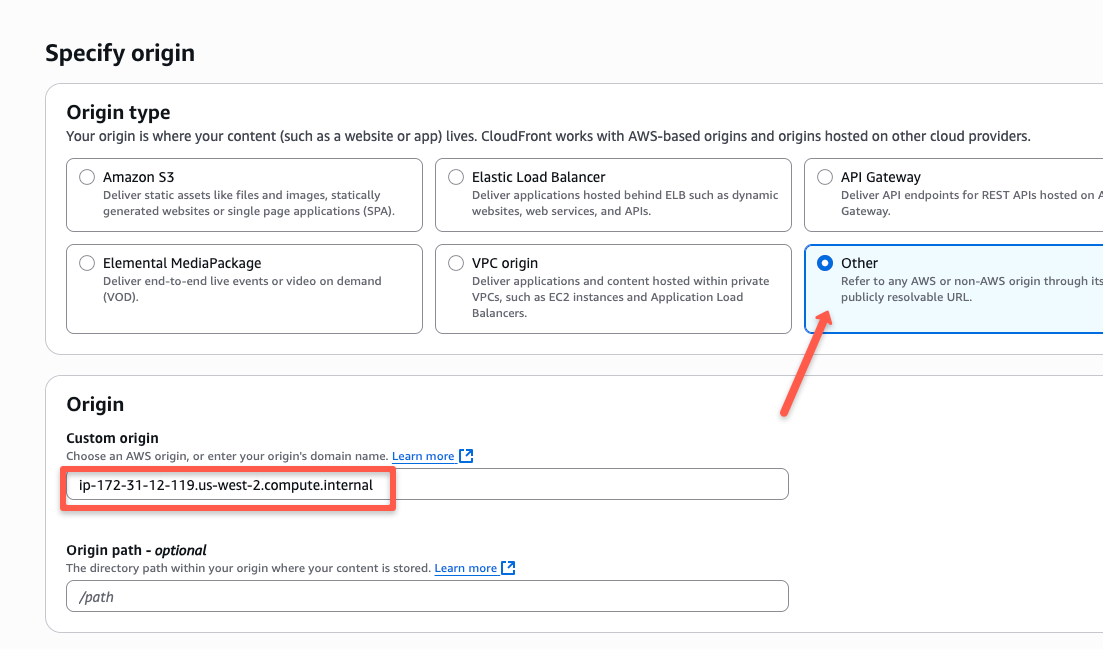
Then on the next tab, select the origin as other and in the origin, give your EC2 instance's Private IP DNS name and click Next.
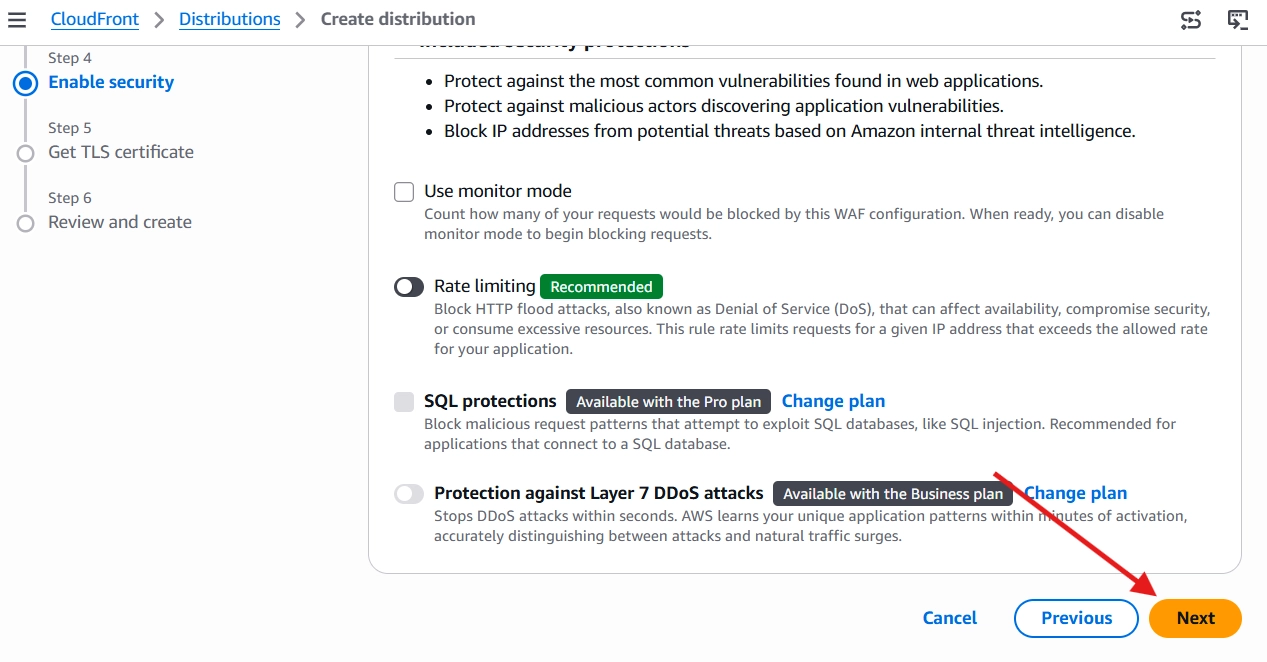
On the next tab, if you want to enable any security features, enable them, or just click the Next button.
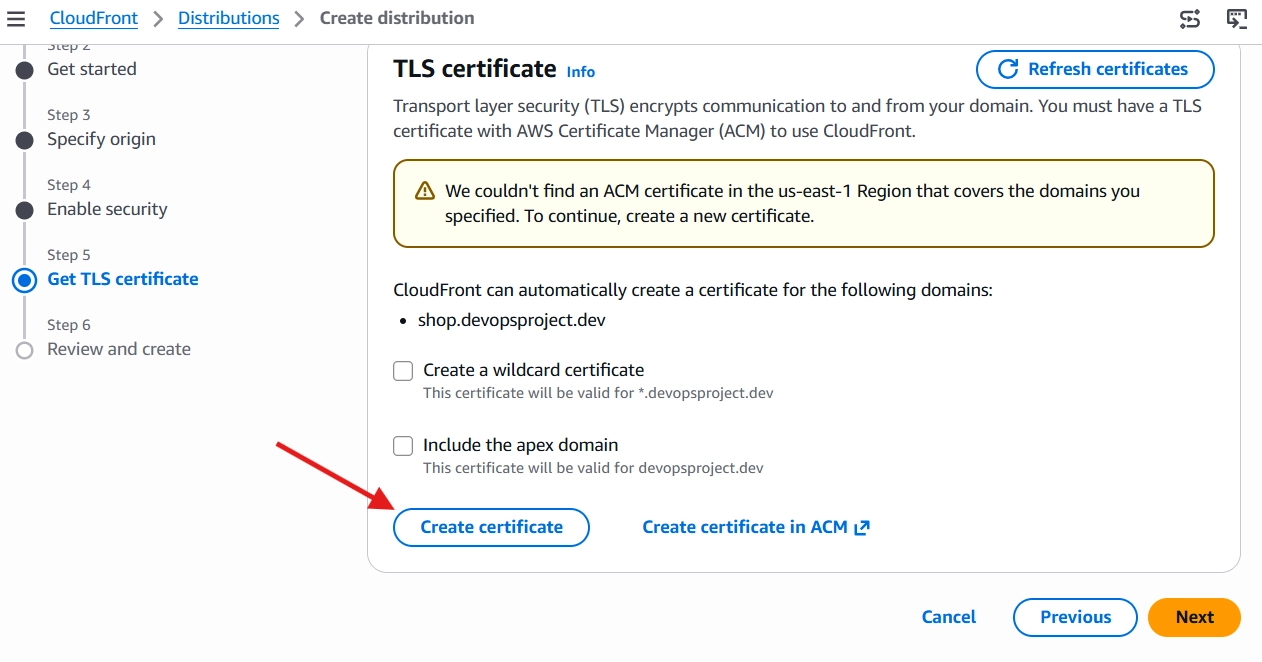
Then, in the next tab, create the TLS certificate for the domain. Just click the Create certificate button, and CloudFront will automatically create the ACM certificate and manage it for us.
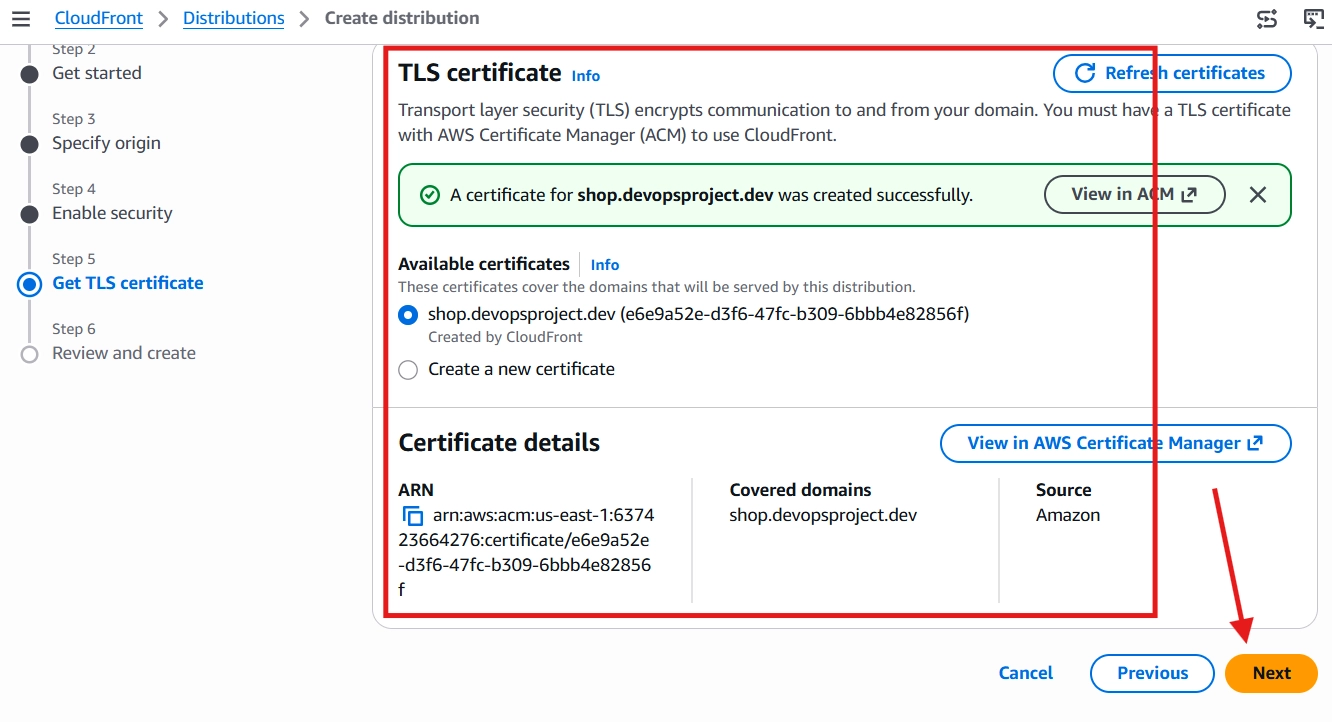
Once its created, click the Next button for final review.
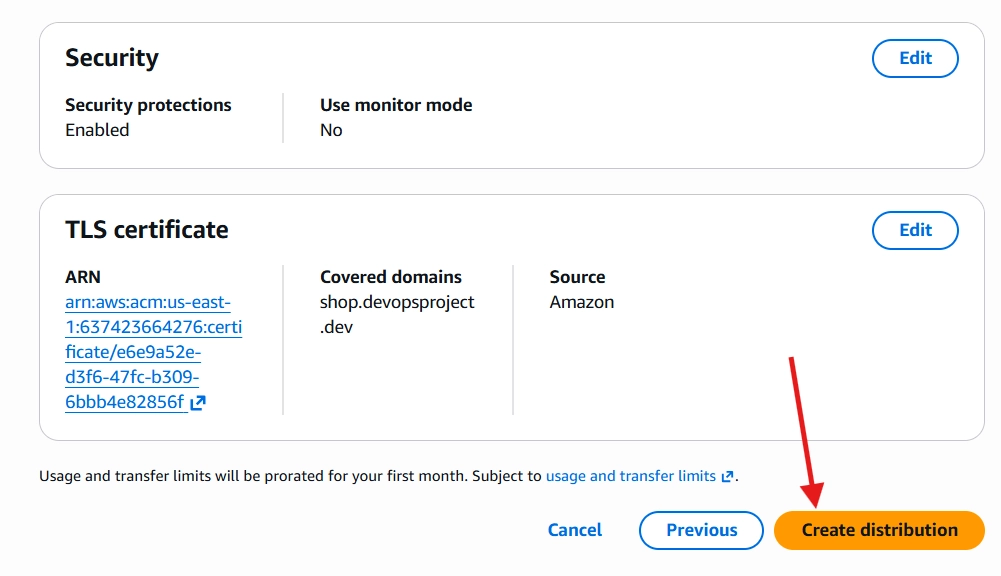
After reviewing everything, click the Create distribution button to create the distribution.
Once its created, you can view the secure Magento UI using your domain as shown below.
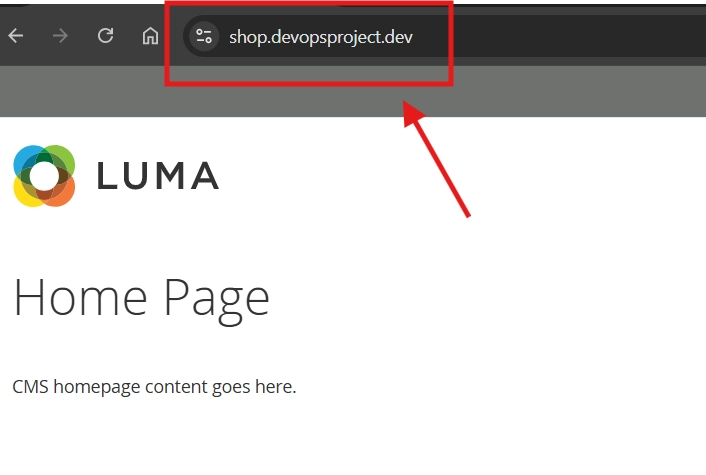
This means Magento is up and running as expected. Now, you can start setting up your e-commerce website in it.
Conclusion
Now, we have deployed Magento on AWS along with the required services from AWS.
I know it's a long process, and you have to configure and manage everything.
It means you are responsible for managing Apache, PHP, OpenSearch, backups, database, and other tools and services in AWS.
But there is a way to make it simple. If you just want to run Magento and don't want to manage the backend infrastructure, you can use hosting services like Cloudways and Hostinger, which manage Magento for you.
Cloudways and Hostinger manage every configuration we did in this guide, you just have to use Magento and don't worry about the backend.
Use a hosting service like Cloudways or Hostinger for managing Magento, whether you are an owner or a team that doesn't want to manage the backend.

