

Joomla is one of the popular open source content management system.There are few steps involved in installing Joomla on an EC2 Ubuntu instance. Follow the step by step process to install Joomla.
1. Launch Ubuntu Instance:
How to launch Ubuntu instance on Amazon EC2
2. Connect the Ubuntu Instance using putty:
How to connect Amazon instance using putty
3. Installing the LAMP stack:
Install the full LAMP stack using the following command.
sudo apt-get install lamp-server^
4. Configuring database:
A database has to be created with a user ,granting all privileges to the user.You can do this in two ways. Either you can do it manually using putty or you can install PHPMyAdmin and you can configure the database there. I have explained both the steps below. You can go with any one of the method.
Configuring Database manually:
# sudo mysql -u root -p
# CREATE DATABASE joomlademo;
# CREATE USER demouser;
# SET PASSWORD FOR joomlauser = PASSWORD("demopassword");
# GRANT ALL PRIVILEGES ON joomlademo.* TO demouser@localhost IDENTIFIED BY 'passwod';
# FLUSH PRIVILEGES;
# exit
Configuring database through PHPMyAdmin:
Install PHPMyAdmin using the following code
sudo apt-get install phpmyadminNow copy the public DNS of your instance followed by PHPMyAdmin [ec2-43-22-236-158.compute-1.amazonaws.com/phpmyadmin] and
Login using username "root" and your Mysql password.
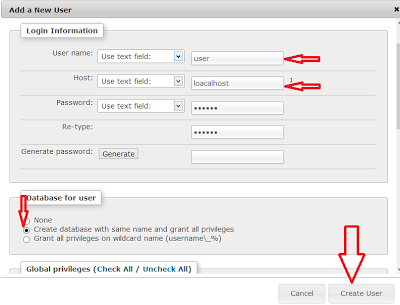
Go to-->privileges-->add new user and give the user name.password of your choice and select the database privileges as shown in the figure below.

5. Configuring apache server:
To configure apache for Joomla you need Joomla configuration folder in apache folder. It is done by the following command
sudo cp /etc/apache2/sites-available/default /etc/apache2/sites-available/joomlaNow set up Joomla site and restart the apache server using the following commands
sudo a2ensite joomla
sudo service apache2 restart
6. Downloading and installing Joomla:
Download the Joomla3 setup file using the following code.
sudo wget http://joomlacode.org/gf/download/frsrelease/17574/76732/Joomla_3.0.1-Stable-Full_Package.zipMake a folder named Joomla inside www folder
sudo mkdir /var/www/joomlaIt is in Zip format. So you have to install zip to unzip the Joomla files. Use the following code to install zip
sudo apt-get install zipNow unzip the Joomla files to www
sudo unzip -q Joomla_3.0.1-Stable-Full_Package.zip -d /var/www/joomlaIn order to allow Joomla to write to your file system during installation, you have to set permissions for Joomla using the following commands
sudo chown -R www-data.www-data /var/www/joomla
sudo chmod -R 755 /var/www/joomla
Now copy the public DNS of your ubuntu instance followed by Joomla [ec2-23-22-186-158.compute-1.amazonaws.com/joomla] paste it into the browser and hit enter. Enter the necessary details and follow the steps in the installation process.Once you enter all the credentials you will be asked to remove the installation files. Click remove it button and set up your site using the Joomla dashboard.
Also read: How to setup Joomla on ec2 using bitnami
