
Appfog is an excellent platform-as-a-service which offers free application hosting up to 2GB of memory. You can deploy 8 application instances for free, in which the 2GB memory will be shared among the applications. Your applications will be deployed with Amazon, Windows Azure and Rackspace cloud. Which are the top solid cloud computing infrastructure providers, so your applications will be running 24X7 without any downtime. Appfog supports Java, PHP , ruby on rails, Django framework and much more. You can create applications and test it for free. It is kind of "all in one " platform. Another amazing thing about appfog is , using a custom domain for your applications, even if you use the free plan. You can use the free plan for learning and testing purposes. You can also use it for low traffic website, like your family website etc,.. In this tutorial am going to explain, how to deploy Wordpress and Drupal content management systems on appfog and use custom domain for the deployed website.
Getting Started: To get started , you need an appfog account, which you can create here Appfog.com. Login to your appfog account and follow the steps given below.
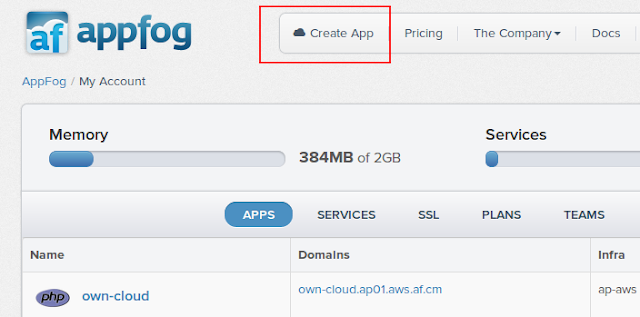
Step 1: Click create app button on the top menu.
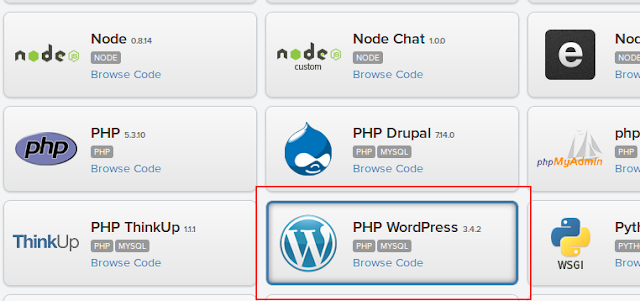
Step 2: You you click create app button, you will see a list of applications. Select application based on your development platform, here we are going to select a Wordpress application.
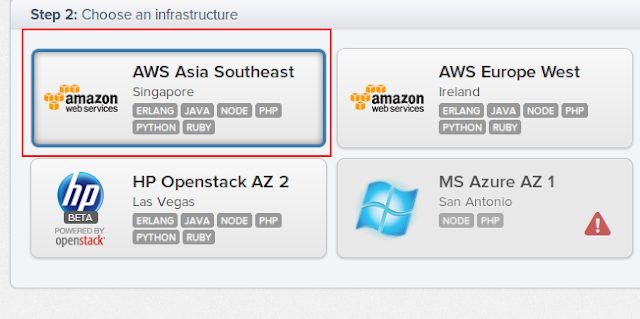
Step 3: After choosing the application you have to choose the infrastructure to deploy your application. You can choose the infrastructure region which is close to your country. Here I am going to select amazon singapore region.
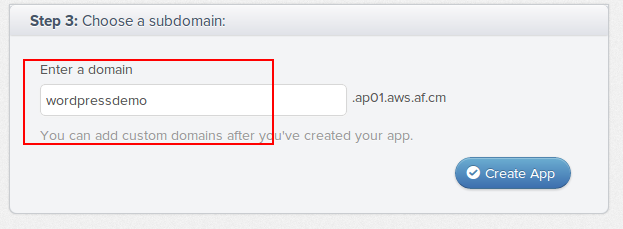
Step 4: Give a name to your Wordpress site and click create app. It will have the appfog extension, but later you can change it to your custom domain name. If you don't have a custom domain , you can use the default appfog domain name to access your Wordpress account.
Step 5: Now go to the homepage, there you can see the application status and how much memory the application is using. Click the subdomian of the application you created. It will take you to the initial Wordpress configuration page.
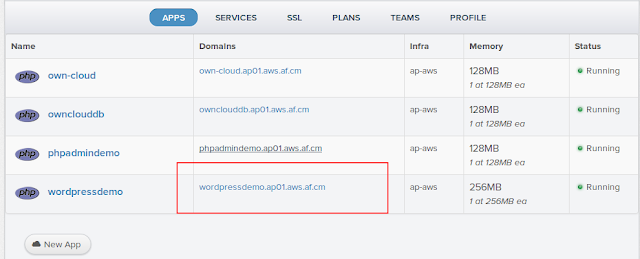
Step 6: Provide the necessary credentials and configure Worpress. Here you don't want to create a database because a mysql database will be automatically configured by appfog. You can see the created mysql database under services. You can login to the Wordpress account using the subdomain followed by /WP-admin, like a normal Wordpress login. You can see the installed Wordpress site demo here. Wordpreess Demo
Installing Drupal is same like installing Worpress. You just have to select the Drupal application instead of Wordpress when creating an application.
Setting Up A Custom Domain For The Deployed Wordpress:
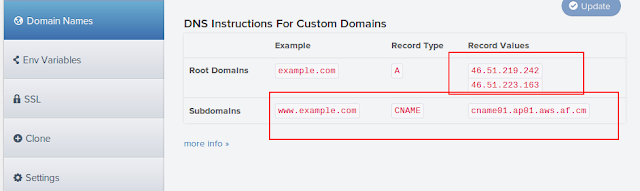
Open the application dashboard by clicking the application name from the homepage. Select domain name from the application dashboard. There you can see the record values for the root domain and subdomains. Using the record values you can point to your custom domain to the application deployed in appfog.
Getting Started: To get started , you need an appfog account, which you can create here Appfog.com. Login to your appfog account and follow the steps given below.
Step 1: Click create app button on the top menu.

Step 2: You you click create app button, you will see a list of applications. Select application based on your development platform, here we are going to select a Wordpress application.

Step 3: After choosing the application you have to choose the infrastructure to deploy your application. You can choose the infrastructure region which is close to your country. Here I am going to select amazon singapore region.

Step 4: Give a name to your Wordpress site and click create app. It will have the appfog extension, but later you can change it to your custom domain name. If you don't have a custom domain , you can use the default appfog domain name to access your Wordpress account.

Step 5: Now go to the homepage, there you can see the application status and how much memory the application is using. Click the subdomian of the application you created. It will take you to the initial Wordpress configuration page.

Step 6: Provide the necessary credentials and configure Worpress. Here you don't want to create a database because a mysql database will be automatically configured by appfog. You can see the created mysql database under services. You can login to the Wordpress account using the subdomain followed by /WP-admin, like a normal Wordpress login. You can see the installed Wordpress site demo here. Wordpreess Demo
Installing Drupal is same like installing Worpress. You just have to select the Drupal application instead of Wordpress when creating an application.
Setting Up A Custom Domain For The Deployed Wordpress:
Open the application dashboard by clicking the application name from the homepage. Select domain name from the application dashboard. There you can see the record values for the root domain and subdomains. Using the record values you can point to your custom domain to the application deployed in appfog.

